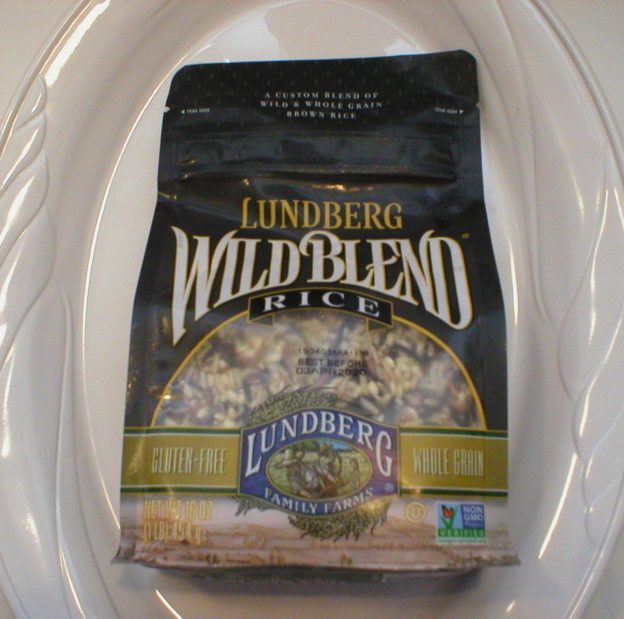
I did an unbiased review of Lundberg Family Farms’ Wild Blend Rice. It’s a combination of long grain brown rice, sweet brown rice, wild rice, Wehani red rice, and black rice. It’s 100 percent whole grain with nothing else added. I spotted this on one trip to the grocery store and decided to give it a try. The video below is my first encounter with this special blend of grains. My notes on the review follow the video link.
If you have not tried this blend of rice, let me encourage you to give it a try. It’s different than plain rice, with a bit of an “earthy” flavor from the wild rice in the mix.
I hope this helps!
Judi
Review of Lundberg Wild Blend Rice
Note: I have no official ties with Lundberg Family Farms. I purchased the rice package with my own funds and have not been prompted in any way by the company to do a review of this nor any of their products. This is an unbiased review.
A package of Lundberg Wild Blend Rice was purchased. One cup of the blend, plus one tablespoon of butter (a suggested optional ingredient in the instructions) was cooked according to package directions, with 1-3/4 cups of water. The following are the results.
Cooking Time: The package directions state to bring everything to a boil, then lower the heat, and cook the blend at a simmer for 45 minutes in a pot with a tight-fitting lid. The package directions state to use either water or broth. I opted for water so I would have no added flavoring which might skew my taste perception of the blend. I added the amount of water called for in the recipe, which was 1-3/4 cups. At 35 minutes into the cooking time, I noticed that the water was all absorbed. I tasted the rice for texture and it was a little chewy, but done enough for me (I don’t want my rice to be mushy). The package directions state that if the rice is not soft enough when the cooking time is up, to add one or two tablespoons more of the liquid and continue cooking. I opted to not do this. At the 35 minute mark, I removed the pot from the heat and allowed the rice to finish the “steaming” process for another 10 minutes, as per the instructions.
Cooked Lundberg Wild Blend Rice
When finished, the rice was slightly chewy and cooked enough (it was not hard inside). Again, it was cooked enough for me. It was not mushy, which I prefer.
Options and Comments: I could have added a little more liquid at the 35 minute point, or even added a couple tablespoons more liquid in the beginning. In all fairness to Lundberg, I have an electric stove and it took a little while for the temperature to lower from a hard boil to a slow simmer. This may have caused extra water to evaporate that may have been needed in the cooking process. Bear this in mind if you use an electric range. The heat on a gas range would have been lowered much faster, possibly resulting in needing the full cooking time without extra liquid, as per the instructions.
Flavor: The rice blend had a good flavor; but as rice can be, it was a little bland. The wild rice in the blend gave it a bit of an “earthy” flavor. I can see where the flavor would have been enhanced by some salt being added in the beginning, OR by using a vegetable broth instead of the water. Either option would have enhanced the flavor just enough to make it a very tasty side dish on its own.
Options and Comments: After tasting the rice blend without added flavorings, I could easily see how some added onions, garlic, bell pepper, and seasonings would make it an absolutely delicious side dish that would pair well with many foods. I will be doing some experimenting with this blend, keeping these things in mind!
When I cook the blend in the future, I will add a little salt into the cooking water, if not using vegetable stock with salt already in it. This should help to bring out the natural nutty flavor of the various grains in the blend.
Would I recommend this product? Yes. If you enjoy rice and are looking for something a little different than plain rice, this would be a fine option. I suggest you flavor it any way you would normally flavor rice that you enjoy. The addition of the wild rice in this blend gives it a little different flavor than that of plain rice.
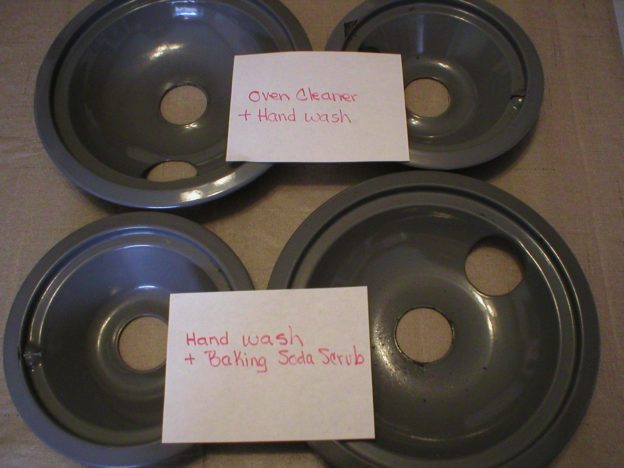
I conducted a comparison test of two different ways to clean electric range burner drip pans. One method used no-heat-needed oven cleaner. The other method was washing with baking soda and a blue scrub sponge. Below is a video demonstration of the test. The test notes, including pros and cons of each method, are below the video link. I hope this helps you decide which method is right for you.
Enjoy!
Judi
Comparison Test: Two Ways to Clean Stove Drip Pans
The following covers details of a comparison test I conducted of two ways to clean electric stove drip pans.
Method 1: Scrub with baking soda and blue scrub sponge
Two electric stove drip pans were washed with dish detergent in warm water to remove any loose debris. They were then sprinkled liberally with baking soda and scrubbed with the rough side of a damp blue scrub sponge. The pans were rewashed in soapy water and dried with a towel.
Results: Most, but not all, of the food debris was removed with some effort of using the scrub sponge and a toothbrush in the tight crevices of the pans. It was difficult, if not impossible, to remove all of the debris that was in the tight folds of the drip pans.
To test if the oven cleaner would further remove residue that the baking soda would not, the one pan that still had some residue on it was sprayed with oven cleaner and returned to the garage. It was allowed to treat for 5-1/2 hours. (Note: The instructions on the can say to allow the spray to treat the oven cavity for 2 hours or overnight, so this timeframe was in between the recommended treatment times.)
Result: The oven cleaner did remove the small amount of remaining food stains from the tight crevices of the drip pan. The pan was cleaned in the same manner as in Method #2 below. No effort was needed to remove the remaining stains from the drip pan when the oven cleaner was used.
Pros:
* No harsh chemicals were involved.
* The baking soda and scrub sponge removed all of the residue from the drip pans, except where scrubbing was extremely difficult, in the tight crevices of the pan.
* Baking soda is safe and effective.
* This method is very inexpensive.
* This method involves something already available (baking soda and a scrub sponge) in most kitchens.
Cons:
* It took some scrubbing action to remove the debris, so there is some work involved.
* It takes a little time to clean the pans this way, depending upon how dirty the drip pans are.
* This method may not remove everything from the pans, especially in tight crevices.
* It is very hard to scrub in crevices of the drip pans. The toothbrush worked a little better than the sponge since the bristles reached into the folds of the pan, but still did not remove everything. Perhaps another type of brush or tool would have done a better job.
Method 2: Spraying drip pans with no-heat-needed oven cleaner
Two electric stove drip pans were sprayed with no-heat-needed oven cleaner. They were placed on newspaper and left overnight in a garage. The next day, they were rinsed with warm water and lightly scrubbed with the rough side of a damp blue scrub sponge. The pans were then washed in warm soapy water and dried with a towel.
Results: All of the food debris rinsed off the drip pans with little to no scrubbing effort needed. Other than chips and mars in the finish of the drip pans, they looked as clean as if they were new.
Pros:
* This method is extremely easy. Just spray and let the pans sit overnight, followed by a light scrubbing the next day.
* This removed all residue from the pans.
* Very little effort was needed to clean the pans.
* This method required very little time.
* No hard scrubbing was needed to remove the food debris.
Cons:
* This method involves a harsh, potentially harmful chemical.
* To be safe, it’s helpful to spray and leave the drip pans in a garage or on a porch (outside of the house).
* Gloves may be needed with this method if you have sensitive skin.
* You may need to take precautions not to breathe in the fumes.
* The oven cleaner may not be something you have readily available.
* The oven cleaner releases harmful chemicals into the environment.
* This method is a bit more costly than Method #1.
Conclusion
Both methods produced very satisfactory results. The use of the oven cleaner provided the easiest and most effective way to remove food debris from the drip pans with little effort. However, the downside of using harsh chemicals may not make it the best choice for all people.
The baking soda method offers a very effective alternative, with a cost-savings advantage plus a less harmful chemical being used in the process. If using the baking soda method, to prevent buildup in the tight crevices of the drip pans, it would be advantageous to clean the drip pans on a regular basis, helping to prevent permanent staining and hard crusting of debris on the pans. With that, the cleaning results would be excellent and even more comparable to that of using the oven cleaner.
Overall winner on effectiveness and ease of use: Method #2, No-heat-needed oven cleaner
A VERY close runner-up: Method #1, Scrubbing with baking soda and the scratchy side of a blue scrub sponge.
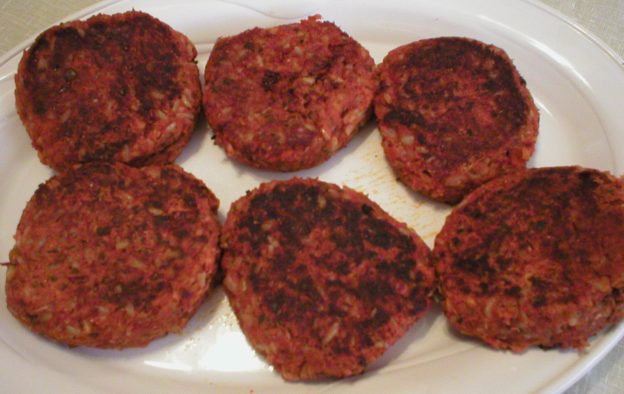
Here’s a recipe for a meatless burger than I’ve been making for years. It’s flavorful and a very flexible recipe. You can use any type of bean or legume you want and the flavorings are easy to adjust to your preferences. Give it a try! The recipe is below the video demonstration. Enjoy!
I hope this helps!
Judi
https://youtu.be/iXLysvJ47Bs
Meatless Burgers
Makes about 6 Patties
2 cups COOKED beans of choice* (or 1 (15 oz) can of beans of choice, rinsed and drained)
½ cup quick oats (dry, not cooked)**
2 tsp garlic powder (or 8 small cloves of fresh garlic)
1-1/2 Tbsp dried parsley flakes
1 tsp dried oregano
1-1/2 to 2 Tbsp dried minced onion (or ¾ to 1 cup diced fresh onion)
¼ tsp black pepper
½ tsp salt
1 cup cooked rice of choice
1 small can (6 oz) tomato paste
¼ cup + 2 Tbsp water, or as needed
1 to 2 Tbsp extra virgin olive oil
Place cooked beans in a food processor and process until the beans are somewhat broken up (it does not need to be perfectly smooth like hummus); set aside.
Place the oats, garlic, parsley, oregano, onion, pepper and salt in a large bowl; stir to combine. Add the cooked rice and stir to combine. Stir in the processed beans and the tomato paste; combine well. Add water as needed to make the mixture the texture and thickness of a raw ground beef mixture, and ingredients are moist and hold well together, but not soggy wet. If needed, add a little water (1 or 2 tablespoons at a time) to help the mixture to blend better. It needs to be moist enough to hold together, while being a little soft, but not so wet that patties won’t hold together or are sticky to handle. If the mixture is too moist, add a little more oats to the mixture and allow it to rest a few minutes so the oats can soak up the extra moisture.
Divide the mixture into ½ cup portions and form patties. If there is a little extra, just add it to the patties already made if it’s not enough for a whole patty.
Heat a large skillet over medium heat. Add 1 to 2 Tbsp extra virgin olive oil and allow it to heat briefly. Carefully place the patties in the skillet. Lower the heat to medium-low and allow them to brown on the first side as they begin to firm up on the inside. If they are browning too fast where the inside is still very soft and the outside is too brown, reduce the heat on the stove a little more. When the patties are golden brown on the first side, carefully turn them and allow the second side to brown. The patties are done when they feel firm to the touch and both sides are browned, about 20 to 30 minutes depending upon how hot the skillet is. It is fine to flip the burgers more than once if needed. Serve immediately as you would any burger patty. Store extra patties covered in the refrigerator and use within 4 or 5 days.
* Literally any bean or legume (or any combination) can work in this recipe. Whatever you have on hand and want to use is fine. Canned, freshly cooked, or cooked and frozen can all be used in this recipe. If you have cooked and frozen beans, be sure to thaw them first.
** Old fashioned rolled oats can also be used, but place them in a food processor and pulse it a few times to break the oats up before using them.
About Judi
Julia W. Klee (Judi) began her journey enjoying “all things food” in elementary school when she started preparing meals for her family. That love of food blossomed into a quest to learn more and more about health and wellness as related to nutrition. She went on to earn a BS Degree in Food and Nutrition, then an MS Degree in Nutrition. She has taught nutrition and related courses at the college level to pre-nursing and exercise science students. Her hunger to learn didn’t stop upon graduation from college. She continues to research on a regular basis about nutrition as it relates to health. Her hope is to help as many people as possible to enjoy foods that promote health and wellness.
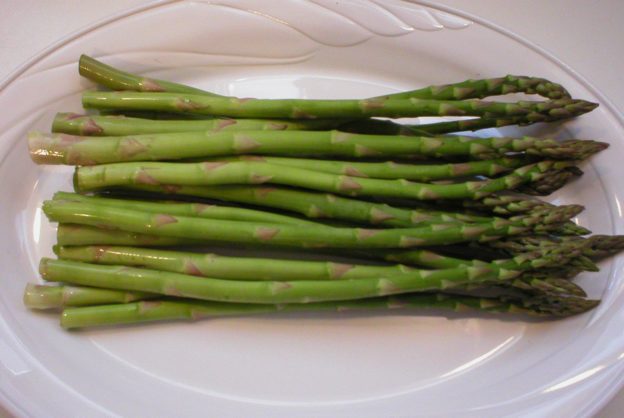
If you need to know something about asparagus, you’re in the right place! Below is a lot of information from what asparagus is and how it grows to suggested recipe links and everything in between. I hope this helps!
Enjoy,
Judi
Asparagus 101 – The Basics
About Asparagus
Asparagus spears, as we find them in grocery stores, are actually young shoots of a plant that (if not harvested) would grow into a large fern-like structure. Most asparagus commonly sold in the United States is green. In Europe, asparagus is usually grown in a different manner yielding a white, mild flavored variety of the plant. Creative farmers have recently learned how to cultivate a purple variety of asparagus that is starting to be found in some grocery stores.
Asparagus is native to Africa, Asia and Europe. Over time, it spread to North and South America, New Zealand, and Australia. China, Peru and Mexico currently produce most of the world’s asparagus crop. Most of the asparagus grown in the United States is produced in California, Washington and Michigan.
Nutrition Tidbits
Asparagus is an excellent source of Vitamin K, assorted B-Vitamins, copper, selenium, and Vitamins C and E. It is also a good source of fiber and other vitamins and minerals including manganese, calcium, potassium, phosphorus, iron, magnesium, and zinc. Of course, being a plant food, it has no cholesterol. One cup of raw asparagus has a mere 27 calories.
Some people express concern about a particular odor in their urine after eating asparagus. This is nothing to be concerned about. It’s actually due to the breakdown of a particular antioxidant in asparagus that has numerous health benefits, especially in aerobic metabolism. In fact, researchers have identified almost 100 different phytonutrients in asparagus that make this vegetable a unique nutritional workhorse, unlike any other. The antioxidants in asparagus make it a powerful anti-inflammatory food.
How to Select Asparagus
When shopping for asparagus, look for firm, brightly colored stalks. Opt for thinner stalks because they are more tender than the thicker ones. Choose stalks with closed and deeply colored tips as they will be fresher. Also, opt for ones with less woody, tough stems so there will be less to discard when you prepare them.
How to Store Asparagus
Store asparagus in the refrigerator and use it as soon as possible after bringing it home. There are two suggested ways to store asparagus while in the refrigerator: (1) Wrap the ends in a damp paper towel, or (2) Stand the stalks upright in a container wide enough to hold them. Add enough water to allow the bottoms of all the stalks to rest in about one inch of water. The upper stalks may be loosely covered with a plastic bag. Change the water if it starts to look cloudy.
Here’s a video on “The Best Way to Store Asparagus” …
How to Freeze Asparagus
To freeze asparagus, wash it, then remove the woody ends and cut it into desired lengths. Blanch it in boiling water for 1 to 3 minutes, depending on the thickness of the stalks and length of the pieces. If steam-blanching is preferred, place the asparagus pieces in a steamer basket over boiling water. Cover with a tight-fitting lid and allow to steam for 3 to 6 minutes, depending on the thickness and length of the stalk pieces.
Immediately transfer the blanched asparagus to a bowl of ice water and allow it to cool completely. Drain and place the asparagus in an air-tight freezer container.* It may be stored in the freezer for 8 to 12 months. It is not mandatory to thaw the asparagus pieces before cooking.
* To keep the pieces from bunching up and freezing into one big lump, you could place your blanched and drained asparagus pieces on a tray. Place the tray in the freezer for one or two hours until the asparagus pieces are frozen. Then transfer them to a container or freezer bag for storage in the freezer.
Blanching vegetables before storing them in the freezer is an important step in stopping the enzyme activity which will continue to age them even in the freezer. Some people choose to freeze vegetables without blanching them first. If you opt to do this, be sure to label them with the date and use them within four to six weeks. Beyond that, they will start to deteriorate with changes in color, texture, and flavor.
Fresh vs Frozen vs Canned
Asparagus is available canned, frozen and fresh in most grocery stores. As is the case with most vegetables, fresh is best with regard to flavor, aroma, texture, and nutritional value. Frozen vegetables are a close second choice with regard to those same aspects and are a wonderful convenience when fresh is not available or you are short on prep time in the kitchen. Canned asparagus spears are found year-round in most grocery stores and can be a good staple food to have available in a pinch. Since the canning process actually cooks vegetables along the way, canned asparagus spears are extremely tender and will not have the crispness of fresh or even frozen asparagus pieces. They simply need to be briefly heated and are ready to serve. However nutritionally speaking, the canned variety comes in last on the list.
How is asparagus usually eaten…raw or cooked?
Asparagus is usually cooked before being eaten; however, the thinner, tender stalks can be enjoyed raw. They can be a nice crunchy addition to a green salad.
How to Prepare Asparagus
Of course, give your asparagus a good wash first. Some people will opt to peel the bottom portion of the asparagus stalks with a vegetable peeler if they are thick and somewhat woody, although this is not mandatory. Cut or break off the woody area toward the bottom of the stalks, and discard or save them for stock. Cut the remaining portion into desired lengths or leave whole.
Cooking/Serving Ideas
Asparagus can be boiled, steamed, sautéed, roasted, pickled, grilled, and included in frittatas, omelets, soups, and stir-fries. Thin, tender stalks can be eaten raw. Most importantly, asparagus cooks up and becomes soft quickly, so less is best when working with asparagus. Thinner stalks take less time to cook than thicker ones, so this is important when determining cooking times.
To boil asparagus, bring water to a boil in a skillet or saucepan. Add prepared asparagus to the pan and boil for 5 to 7 minutes, or until as tender as desired.
To microwave your asparagus, place your prepared asparagus pieces into a microwave-safe dish. Add 2 tablespoons of water, cover, and microwave on high for 4 to 6 minutes, rearranging spears midway to allow them all to cook evenly.
To steam asparagus, lay the stalks in a steamer basket over boiling water. Cover and steam for 5 to 7 minutes, until crisp-tender.
To stir-fry asparagus, cut it into one-inch pieces, and stir-fry it in a wok or skillet with 1 or 2 tablespoons of butter or oil, for 5 to 7 minutes.
To roast asparagus, arrange prepared stalks in a single layer in a large shallow baking pan. Drizzle with 1 or 2 tablespoons of olive oil and sprinkle with salt and pepper. Roast at 425°F for 10 to 15 minutes, until tender, but firm to the bite.
To BBQ asparagus, follow the same preparation method as roasting (above), but lay the asparagus spears on aluminum foil on the BBQ grill.
Quick Ideas for Using Asparagus:
* When cooking asparagus, remove it from the heat a minute or so before you think it is done. It will continue to cook briefly after being removed from the heat.
* Add cooked, cold asparagus to your favorite green salad.
* Add asparagus to your favorite omelet.
* Add asparagus to cooked pasta dressed with some olive oil, herbs and Parmesan cheese.
* Sauté asparagus with garlic, onions, mushrooms, and beans, tofu or chicken. Serve over a bed of rice.
* Save freshly cooked leftover asparagus for use the next day in an egg, pasta, or rice dish.
* Cook asparagus in your favorite way and top it with a little vinaigrette dressing.
* Marinate asparagus with teriyaki sauce, then grill it and sprinkle with sesame seeds.
Herbs/Spices That Go Well With Asparagus
Basil, bay leaf, capers, chervil, chili paste and chili pepper flakes, chives, cilantro, dill, fennel seeds, garlic, ginger, hoisin sauce, hollandaise sauce, horseradish, mint, miso, mustard (Dijon), nutmeg, parsley, pepper, rosemary, sage, salt, sorrel, soy sauce, tarragon, thyme
Other Foods That Go Well With Asparagus
Proteins, Nuts, Seeds: Bacon, beans, eggs, nuts, peanuts and peanut sauce, pine nuts, prosciutto, salmon, sesame, tofu
About Judi
Julia W. Klee (Judi) began her journey enjoying “all things food” in elementary school when she started preparing meals for her family. That love of food blossomed into a quest to learn more and more about health and wellness as related to nutrition. She went on to earn a BS Degree in Food and Nutrition, then an MS Degree in Nutrition. She has taught nutrition and related courses at the college level to pre-nursing and exercise science students. Her hunger to learn didn’t stop upon graduation from college. She continues to research on a regular basis about nutrition as it relates to health. Her hope is to help as many people as possible to enjoy foods that promote health and wellness.
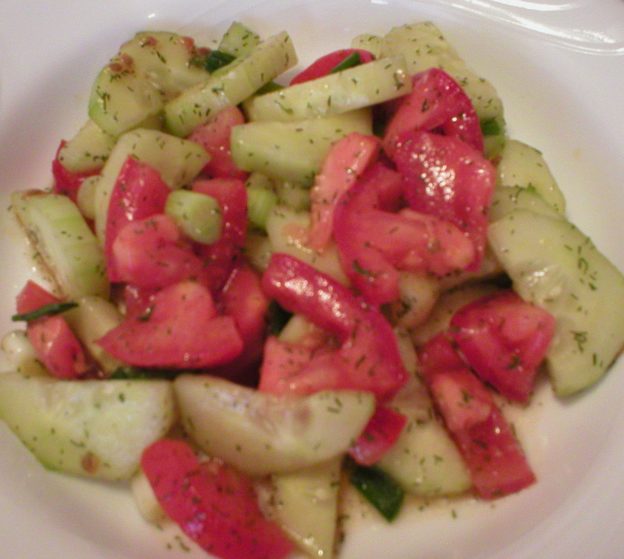
This simple salad is easy and fast to make, and oh so delicious! It can be made ahead of time, since marinating for a while in the refrigerator allows the flavors to blend, making it that much tastier. Click the video link for a demonstration on making the salad. The recipe is below the video. Enjoy!
I hope this helps!
Judi
Cucumber Tomato Salad with Dill
Makes About 4 Servings
1 cucumber
2 Roma tomatoes
2 scallions, or 1/3 to ½ cup chopped onion of choice
2 Tbsp extra virgin olive oil
1 Tbsp apple cider vinegar or fresh lemon juice
1/2 tsp dried dill weed (or ½ Tbsp fresh dill weed), or more if desired
Salt to taste
Cut cucumber (peeling is optional), tomatoes, and scallion into bite-size pieces and place in a serving bowl. Top with the olive oil, vinegar or lemon juice, dried dill weed and salt. Toss to combine. Serve or cover and refrigerate until needed.
This salad can be allowed to marinade in a covered container in the refrigerator for up to 24 hours. This gives time for the flavors to blend. It is delicious served immediately but is even better when made in advance.
About Judi
Julia W. Klee (Judi) began her journey enjoying “all things food” in elementary school when she started preparing meals for her family. That love of food blossomed into a quest to learn more and more about health and wellness as related to nutrition. She went on to earn a BS Degree in Food and Nutrition, then an MS Degree in Nutrition. She has taught nutrition and related courses at the college level to pre-nursing and exercise science students. Her hunger to learn didn’t stop upon graduation from college. She continues to research on a regular basis about nutrition as it relates to health. Her hope is to help as many people as possible to enjoy foods that promote health and wellness.
If you haven’t tried a mango, let me personally invite you to venture into this delicious taste sensation. Ripe mangos are sweet, juicy, and delicious. They are similar to ripe peaches and can often be used interchangeably in recipes calling for peaches. Many people are not aware that you can also eat unripe mangos. The unripe fruit has a peppery flavor and can easily be used in savory dishes where a peppery flare is welcomed.
If you’re new to mangos, the information below should help you out. If you’re already familiar with mangos, yet are looking for something different to do with them, you’re in the right place! There is a LOT of information on what to do with mangos! I hope this helps!
Enjoy,
Judi
Mangos 101 – The Basics
About Mangos
Mangos are a popular fruit around the world. Botanically, it’s a drupe, with an outer skin, an edible pulp, and a central stone that houses a single seed. Peaches and plums are also drupes. Mangos are fruits of an evergreen tree in the cashew family. There are over 1,000 different varieties of mangos, with some being round while others are oval.
Mangos were first grown in India over 5,000 years ago. From there, mangos were slowly introduced around the world. Spanish explorers brought mangos to South America and Mexico in the 1600s. Mangos were first introduced to America in 1833 when they were brought to Florida. In India, a basket of mangos is considered to be a sign of friendship, with the mango itself being a symbol of love.
Nutrition Tidbits
One cup of mango meets 100% of our recommended amount of Vitamin C and about a third that of Vitamin A. Mangos also supply fiber, folate, Vitamin B6, copper, Vitamin K and potassium. They have no cholesterol, sodium nor fat. One cup of mango has about 100 calories.
How to Choose a Mango
Color is not always the best indicator of ripeness with mangos. A ripe mango will give a little when squeezed, like a peach or avocado. A red color will appear on some varieties of ripe mangos, but not all. Also, a fruity aroma can be detected at the stem end of many (but not all) varieties of mangos. With all things considered, the squeeze test is the best way to determine if a mango is ripe.
Avoid mangos with bruises or shriveled skin. Those are past their prime and are not the best selections.
Unripe mangos are very edible, but are not sweet. They have somewhat of a peppery flavor and can be used in savory applications. Ripe mangos are deliciously sweet and are used in most recipes calling for mango as a sweet fruit.
How to Ripen and Store a Mango
Store unripe mangos at room temperature. Green mangos will ripen at room temperature over several days. To hasten ripening, place green mangos in a paper bag kept at room temperature.
To slow down the ripening process, store ripe mangos in the refrigerator for up to five days. Storing mangos too long in the refrigerator will cause them to turn black.
Peeled and cubed mango may be stored in an airtight container in the refrigerator for several days or in the freezer for up to six months.
How to Cut a Mango
First wash your mango. The peel will need to be removed as it can cause irritation in the mouth. The stone inside needs to be removed. It is large and somewhat flattened. Observe how the mango lays on your counter. It will position itself so the stone is parallel with the counter. Stand the mango up on the stem end and slice it parallel to the stone on each side of the stone. Then make narrow slices down the sides of the mango along the wide side of the stone. If your knife hits the stone in the process, simply move the knife outward just a bit and try again.
After removing the stone, with a knife cut away the peel, then slice or cube the mango as needed. Sometimes, the peel of very ripe mango slices can simply be peeled back with fingers and removed that way. The flesh of ripe mango can be very slippery to handle, so use caution when slicing it so you don’t cut yourself.
One large mango may yield up to two cups of mango cubes.
Important note! Mango juice can stain clothes, so take precaution when preparing it.
Serving Ideas
Mangos are usually eaten fresh, but there are some recipes available where creative individuals have incorporated them into baked goods, pies, mousses, curries, cobblers, and crisps (see recipe links below!). They may also be grilled or roasted.
Here are some quick ideas for including mango into your day:
* Serve mango cubes with your favorite yogurt.
* Make popsicles with pureed mango.
* Top pancakes or waffles with cut mango, then drizzle with maple syrup. Yum!
* Include mango in a breakfast smoothie.
* Drizzle pureed mango over cooked chicken, fish, or pork.
* Include cubed mango in a fruit or green salad.
* Mangos can be used in place of peaches in recipes.
* Add fresh ripe mango to a spinach salad.
* Top baked or grilled salmon with mango salsa.
Herbs/Spices That Go Well With Mangos
Basil, cardamom, cayenne, cilantro, cinnamon, cloves, coriander, cumin, fenugreek, garlic, ginger, lavender, mint, oregano, paprika, parsley, salt, star anise, vanilla, vinegar
Foods That Go Well With Mango Proteins, Nuts and Seeds: Almonds, beans, cashews, chicken, chickpeas, duck, fish, legumes, nuts, peanuts, pork, sesame, tempeh, tofu
Types of dishes and cuisines that mangos are often included in:
Beverages, chutneys, coulis (a thin sauce), crepes, curry, desserts (ie. Cheesecake), Indian cuisine, lassis (a sweet or savory Indian beverage), Mexican cuisine, puddings, salads, sauces, smoothies, soups (ie fruit soup), stir-fries, tarts
About Judi
Julia W. Klee (Judi) began her journey enjoying “all things food” in elementary school when she started preparing meals for her family. That love of food blossomed into a quest to learn more and more about health and wellness as related to nutrition. She went on to earn a BS Degree in Food and Nutrition, then an MS Degree in Nutrition. She has taught nutrition and related courses at the college level to pre-nursing and exercise science students. Her hunger to learn didn’t stop upon graduation from college. She continues to research on a regular basis about nutrition as it relates to health. Her hope is to help as many people as possible to enjoy foods that promote health and wellness.
Sugar snap peas are absolutely delicious, whether enjoyed raw or lightly cooked. They’re sweet, crunchy, delicious, and nutritious. AND the pods are edible, so you don’t even need to shell them! Simply give them a quick wash and pop them in your mouth…oh so good! If you haven’t tried them, please do give them a whirl. Below is a lot of information about these delectable goodies from what they are, to how to cook and flavor them, to suggested recipes, and much more.
Enjoy!
Judi
Sugar Snap Peas 101 – The Basics
About Sugar Snap Peas
Sugar snap peas, also known as snap peas, are members of the legume family. They are a cross between snow peas (flat pea pods commonly used in Asian stir-fries) and garden peas (shelled, and used in “peas and carrots”). Unlike garden peas, the whole pea, pod and all, of snap peas can be eaten. It is crunchy and sweet. They have tough “strings” at the seams of the pod that some people prefer to remove before eating the whole peas. Snap peas can be eaten whole, raw or cooked.
Nutrition Tidbits
Snap peas contain Vitamins K and C along with a variety of B-Vitamins, folate, iron and beta-carotene. They are a good source of fiber as well. One cup of snap peas has only 41 calories, no fat, and 3 grams of protein.
How to Select Sugar Snap Peas
Look for snap peas that are bright green, smooth, and without blemishes. Avoid those that are spotted, discolored, or wrinkled.
How to Store Sugar Snap Peas
Depending upon how old they are when you purchase them, snap peas can keep for up to five days in a plastic bag in the refrigerator. Discard any that have become soft or discolored.
How to Preserve Sugar Snap Peas
To freeze sugar snap peas, wash them well and remove the ends and strings if desired. Place them in boiling water for 1-1/2 minutes, then immediately place them in a bowl of ice water for 2 minutes. Remove and allow them to drain well. Place them on a tray and freeze for one or two hours, so they are frozen separately. When frozen, place them in freezer containers or bags and return them to the freezer. They will keep well like this for 8 months.
Some people choose to freeze snap peas without blanching, by simply placing the washed peas (that have been frozen individually on a tray) in a freezer bag and storing them in the freezer. If you choose to do this, use them within 4 to 6 weeks. If frozen that way, the longer they are stored, the more they will lose their color, flavor, and nutritional content.
Can they be eaten raw?
Snap peas can be enjoyed raw or cooked. The pod is edible, so you can just pop the whole thing in your mouth and enjoy the natural sweetness and crunchiness of the pea for a snack or in salads.
Quick cooking methods such as stir-frying or blanching snap peas will help to maintain their sweetness and crunchy texture.
How to Prepare Sugar Snap Peas
Of course, give your snap peas a good wash before using them. Some people prefer to remove the ends and the string that runs along the seam on the pod, although this step is not mandatory. They can be enjoyed whole or cut as needed for your recipe.
Cooking/Serving Ideas
Sugar snap peas can be eaten raw as a snack or used as a healthful and crunchy addition to any salad. They can be steamed, blanched, boiled, braised, sautéed, stir-fried, or added to soups, pasta dishes, and casseroles. To keep the crispiness of snap peas, eat them raw or cook them very briefly.
Here are some easy ideas for using sugar snap peas:
* Eat them raw as a simple snack…delicious!
* Slice them and add them to your favorite salad for sweetness and crunch.
* Sauté your sugar snap peas and top them with a little lemon zest, salt and pepper.
* Lightly coat them with olive oil, sprinkle them with garlic powder and roast at 400°F for 15 to 20 minutes (turn once during roasting), until they are as crisp and brown as you like. Sprinkle with a little Parmesan cheese and enjoy!
* Add them to a chicken or beef stir-fry dish.
* Stir-fry sugar snap peas with shredded carrots, onion, garlic, salt, pepper, and a little tamari. Serve over cooked quinoa, then top with a little lemon juice or white wine vinegar, and toasted pepitas.
* Add them to your favorite stir-fry noodle dish.
* Add sugar snap peas to orange stir-fried chicken served over rice.
* Add them to your favorite vegetable stir-fry combination.
* Slice sugar snap peas and add them to a veggie pizza.
* Add them to a salad with strawberries, avocado and walnuts on a bed of mixed greens. Top with a lemon honey vinaigrette. (See recipe link below.)
* Blanch peas for 1-1/2 minutes, then cook them for 2 minutes in a bowl of ice water. Drain then transfer them to a bowl. Top with your favorite Italian salad dressing. Enjoy!
Herbs/Spices That Go Well With Sugar Snap Peas
Basil, butter and browned butter, chervil, chives, cilantro, cumin, curry powder, dill, garlic, ginger, horseradish, marjoram, mint, mustard (Dijon), parsley, pepper (black), sage, salt, scallions, shallots, soy sauce, sugar, tarragon, thyme
Foods That Go Well with Sugar Snap Peas Proteins, Nuts, Seeds: Beef, cashews, peanuts, peas, pine nuts, pistachios, sesame, tofu
Vegetables: Asparagus, bell peppers, broccoli, carrots, cauliflower, chiles, fennel, mushrooms, onions, radishes, water chestnuts
Fruit: Lemons
Dairy and Non-Dairy: Cheese (ie Parmesan), coconut milk, yogurt
Grains: Noodles, pasta, rice, whole grains of any sort
About Judi
Julia W. Klee (Judi) began her journey enjoying “all things food” in elementary school when she started preparing meals for her family. That love of food blossomed into a quest to learn more and more about health and wellness as related to nutrition. She went on to earn a BS Degree in Food and Nutrition, then an MS Degree in Nutrition. She has taught nutrition and related courses at the college level to pre-nursing and exercise science students. Her hunger to learn didn’t stop upon graduation from college. She continues to research on a regular basis about nutrition as it relates to health. Her hope is to help as many people as possible to enjoy foods that promote health and wellness.
Honey glazed carrots are simply delicious and not hard to make! Here’s an easy way to make them. See the recipe below the video demonstration. Enjoy!
I hope this helps!
Judi
Honey Glazed Carrots (Using Fresh Carrots)
Makes About 4 Servings
3-1/2 cups sliced fresh carrots (About 1 pound)
2 Tbsp butter*
2 Tbsp honey*
½ cup water
1 Tbsp lemon juice*
Parsley flakes, optional garnish
Wash the carrots and cut off both ends. Peeling them is optional. Cut into slices about ¼-inch to 3/8-inch thick.
Heat a skillet over medium heat. Add the butter and allow it to melt, then add the carrots. Stir to coat the carrots with the butter. Add ½ cup of water and cover the pan. Raise the heat to bring the liquid to a boil, then lower the heat to a simmer. Drizzle the carrots with the honey; stir to combine. Cover the pan and allow the carrots to cook until almost as tender as you want them to be, adding a small amount of water if needed, so all the water does not completely evaporate. When they are almost as tender as you like, remove the lid from the skillet and allow the liquid to reduce, and form the glaze. Stir often to coat the carrots. When they are glazed and cooked to your liking, remove the pan from the heat and drizzle the carrots with the lemon juice. It should take about 12 minutes to cook the carrots to crisp-tender. Sprinkle with dried or fresh parsley flakes, if desired. Serve.
*For a lighter, less sweet glaze, use 1 tablespoon of butter and 1 tablespoon of honey. Also, the lemon juice can be reduced to ½ tablespoon, if desired.
About Judi
Julia W. Klee (Judi) began her journey enjoying “all things food” in elementary school when she started preparing meals for her family. That love of food blossomed into a quest to learn more and more about health and wellness as related to nutrition. She went on to earn a BS Degree in Food and Nutrition, then an MS Degree in Nutrition. She has taught nutrition and related courses at the college level to pre-nursing and exercise science students. Her hunger to learn didn’t stop upon graduation from college. She continues to research on a regular basis about nutrition as it relates to health. Her hope is to help as many people as possible to enjoy foods that promote health and wellness.
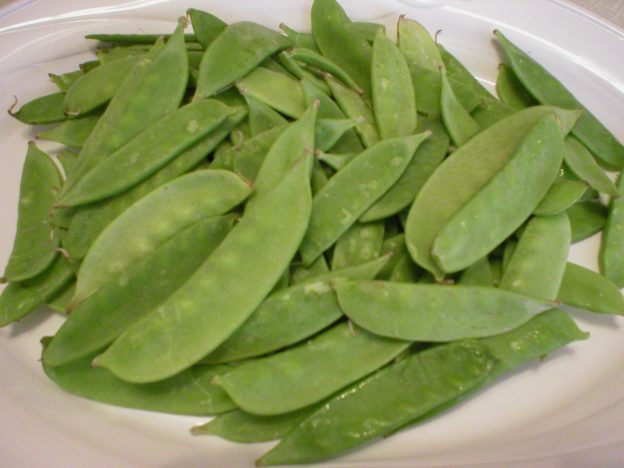
If you want to know something about snow peas, look no further! The following article covers many aspects about the vegetables, from what they are to how to use them along with links to suggested recipes. I hope this helps!
Enjoy,
Judi
Snow Peas 101 – The Basics
About Snow Peas
Snow peas are cousins with sugar snap peas and are in the legume family. They have large flattened green pods with tiny peas inside. They may be called Holland peas in other parts of the world. Interestingly, snow peas were grown and enjoyed in Holland as early as the 1500s. They were very popular in Europe in the 1800s. From there they spread to China where they quickly became a mainstay in their cuisine.
The peak season for snow peas is spring through early summer. Both the pods and peas are edible having a sweet flavor and crisp-tender texture. They are commonly used in Asian cuisine, being included in stir-fries, fried rice, and noodle dishes. Snow peas can also be a nice addition to soups, curries and meat dishes.
Nutrition Tidbits
Snow peas are extremely high in Vitamin C and low in calories. One cup of snow peas has about 67 calories. They are also good sources of fiber, folate and other B-vitamins, Vitamin K, an array of minerals such as calcium, iron, zinc, selenium, copper, and manganese, and antioxidants such as the carotene, lutein, and zeaxanthin. Their nutrient profile helps to fight free radicals and cellular damage, lower cholesterol levels, protect our bones, fight cancers, and protect our brain from dementia.
How to Select Snow Peas
Snow peas are at their best in the spring, but they are available year-round in many grocery stores. Choose ones that look fresh, flat, and are brightly colored with little to no blemishes. Avoid those that look dry or wilted. Also, watch for cracks, bruising, and discoloration, as they are older and less desirable.
How to Store Snow Peas
Refrigerate snow peas in a plastic bag or in the crisper drawer set on high-humidity. Use them as soon as possible, preferably within two or three days of buying them.
How to Freeze Snow Peas
Place washed and trimmed snow peas in boiling water for 1-1/2 minutes. Promptly transfer them to a bowl of ice water for 2 minutes, until completely cooled. Drain, then place them on a tray in the freezer for one or two hours, until frozen.* Transfer the frozen peas to a freezer container or bag. Properly prepared, they will keep frozen for about 8 months.
*Freezing them separately is not mandatory, but will prevent them from freezing into one big lump, making them hard to use without breaking them into smaller pieces.
If you opt to freeze your peas without first blanching, use them within four to six weeks because their quality will quickly deteriorate.
Raw vs Cooked
Snow peas have a mild flavor and may be eaten raw or cooked. Since both the pod and peas are edible, they can be added to salads (whole or cut up) for a nice fresh flavor and light crunch.
In Asian cuisine, they are typically cooked and added to dishes with other foods, like stir-fried vegetables and fried rice.
How to Prepare Snow Peas
Wash your snow peas in cold water and pat them dry. Remove the ends and the string along the seam, if desired, and use them whole or cut them as needed for your recipe.
Cooking/Serving Ideas
Snow peas may be enjoyed raw or boiled, blanched, steamed, stir-fried, sautéed, and added to soups, stews, and curries. When cooked, they are at their best when cooked only briefly, as this retains their crispness, color and nutrients.
To steam snow peas, place them in a steamer basket over boiling water. Cover with a lid and allow them to steam for 3 to 5 minutes, or until crisp-tender.
Here are some ideas for using snow peas:
* Add snow peas to your favorite salad for freshness and a light crispy addition.
* When making an appetizer tray with veggies and dip, include snow peas and sugar snap peas to the options. They would make great vehicles for collecting dip!
* Add snow peas to your favorite stir-fried vegetables.
* Sauté snow peas with garlic in oil and/or butter. Top with a drizzle of lemon juice.
* Include snow peas with other vegetables when making fried rice or noodles.
* Try a stir-fried or stir-steamed medley of snow peas, broccoli, cauliflower, bell peppers, carrots and onions. Add some ginger and garlic for a little zing in the veggies.
* Sauté carrots and snow peas in butter, then glaze with a little honey for some sweetness. A small drizzle of lemon juice can help balance the sweetness, if desired.
* Combine your favorite cooked pasta with some butter and/or olive oil, snow peas, sun dried tomatoes, red pepper flakes, and some Parmesan cheese.
* Try roasting snow peas. Lightly coat washed and trimmed peas with olive oil and a sprinkle of garlic powder. Place in a 400°F oven for 15 to 20 minutes until crispy (turn once during roasting). Sprinkle with grated Parmesan cheese and enjoy!
Herbs/Spices That Go Well With Snow Peas
Cilantro, curry paste, curry powder, five-spice powder, garlic, ginger, hoisin sauce, lemongrass, mint, miso, mustard, pepper (black, Szechuan), salt, soy sauce, tarragon, Worcestershire sauce
Other Foods That Go Well With Snow Peas Proteins, Nuts, Seeds: Beef, cashews, chicken, peanuts and peanut sauce, peas, pork, poultry, scallops, seafood, sesame, shrimp, tofu
Vegetables: Bamboo shoots, bean sprouts, bell peppers, bok choy, broccoli, cabbage, carrots, cauliflower, celery, chiles, kale, mushrooms, onions, radishes, scallions, squash (summer), sugar snap peas, water chestnuts, zucchini
About Judi
Julia W. Klee (Judi) began her journey enjoying “all things food” in elementary school when she started preparing meals for her family. That love of food blossomed into a quest to learn more and more about health and wellness as related to nutrition. She went on to earn a BS Degree in Food and Nutrition, then an MS Degree in Nutrition. She has taught nutrition and related courses at the college level to pre-nursing and exercise science students. Her hunger to learn didn’t stop upon graduation from college. She continues to research on a regular basis about nutrition as it relates to health. Her hope is to help as many people as possible to enjoy foods that promote health and wellness.
If you’re avoiding traditional pasta for whatever reason and are missing it, have you tried spaghetti squash? It’s a nutrient-dense food that is low in calories and carbohydrates. It’s easy to cook and can be used in many dishes that call for traditional pasta noodles. Give it a try sometime! Below is a lot of information that can help as you explore this versatile food.
I hope this helps!
Judi
Spaghetti Squash 101 – The Basics
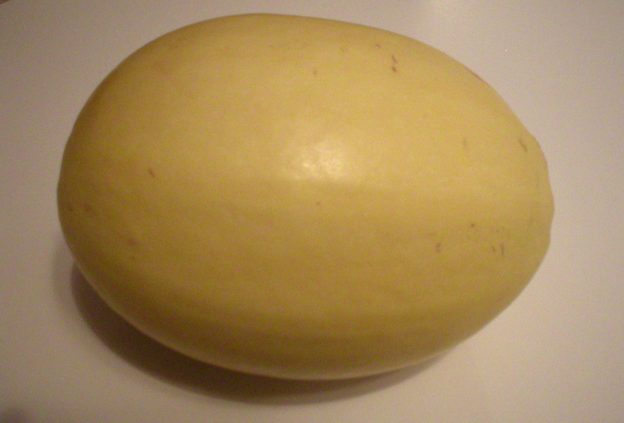
About Spaghetti Squash
Spaghetti squash are members of the Cucurbitaceae family. They are cousins with pumpkins, zucchini, and gourds. They are also known as vegetable spaghetti, noodle squash, mandarin squash, and vegetable marrow. Historians have found written records of the use of spaghetti squash in China from the early 1800s. It has since become popular around the world as a low-carbohydrate alternative to traditional spaghetti.
Spaghetti squash are small to medium in size with an oblong shape and are heavy for their size. The flesh is thick, dense and moist, and separates into long, translucent strings that look similar to pasta. When cooked, the flesh is tender and has a slight crunch and mild flavor. Spaghetti squash is often paired with marinara sauce, meatballs and Parmesan cheese, making a delicious mock spaghetti meal.
Nutrition Tidbits
Spaghetti squash is a nutrient dense food, meaning it is high in nutrients relative to its low number of calories. It is a good source of fiber, Vitamin C, manganese, and Vitamin B6. One cup of cooked spaghetti squash has a mere 42 calories.
Spaghetti squash is also high in antioxidants, particularly beta-carotene, known to help protect our cells from free-radical damage and ward off chronic diseases.
How to Select a Spaghetti Squash
Choose squash that are firm and free of spots and cracks. They should be heavy for their size. If possible, choose one that still has a bit of stem attached, as it can help prevent bacteria from entering the squash.
How to Store Spaghetti Squash
Store unwrapped squash in a cool, dry, and well ventilated place for up to 3 months, depending upon how old they are when you buy them. The ideal storage temperature would be 55 to 60°F. If you refrigerate them, they will keep for 1 or 2 weeks in the refrigerator.
To store cut squash, tightly wrap the cut section in plastic wrap and store it in the refrigerator and use it as soon as possible.
How to Preserve Spaghetti Squash
Cooked spaghetti squash strands can be stored in the freezer for up to 8 months. It’s helpful to remove any excess water first. Place the baked squash in a colander over a large bowl. Cover and place it in the refrigerator overnight. This will help drain off any excess water. Then carefully place the drained strands in a freezer bag and squeeze out the air, or place them in an air-tight freezer container. Store in freezer.
How to Prepare Spaghetti Squash
Preparing a spaghetti squash is easy. Simply wash it, then cut it in half lengthwise. Remove the seeds by scraping them out with a spoon. Place each half, cut side down, on a parchment paper-lined baking sheet and roast at 400F until fork tender. The time will vary depending upon the size of the squash.
When tender, remove from the oven and allow it to cool slightly until it can be comfortably handled. Then turn it over and loosen the squash strands with a fork. Remove them to a bowl and proceed with your recipe. The squash strands can be flavored to your liking and eaten right away without further cooking, if desired.
If you prefer not to cut the squash, simply wash it then poke holes in it with a sharp knife. Roast on a parchment paper-lined baking sheet or pan at 400F until fork tender. Allow to cool until it can be handled. Cut the squash in half and remove the seeds. With a fork, release and remove the strands and prepare as desired.
Cooking/Serving Ideas
Use cooked spaghetti squash strands as if they were cooked spaghetti. Their use is only limited to your imagination!
For a decorative way to serve spaghetti squash, reserve the halved shells after removing the strands. Prepare your recipe, then use the shell halves as serving bowls.
Simple serving ideas:
* Toss the cooked squash strands with your favorite tomato sauce. Add meat of choice, if desired, and sprinkle with cheese. Serve in the shell halves for a decorative touch!
* Combine cooked squash strands with your favorite stir-fried veggies.
* Toss cooked squash strands with your favorite pesto. Top with cut grape tomatoes and your favorite cheese.
* Sauté chopped garlic in butter or olive oil. Stir in cooked spaghetti squash strands until heated. Remove to a serving platter and sprinkle generously with Parmesan cheese.
* Sauté cooked squash strands in some butter or olive oil with a mixture of fresh basil, parsley and chives. A touch of garlic would be a nice addition. Sprinkle with salt and pepper to taste. Top with Parmesan cheese, if desired.
* Toss cooked squash strands with steamed broccoli, a little olive oil, and a sprinkle of lemon pepper. If desired, top with Parmesan cheese.
* Spread cooked spaghetti squash strands on an ovenproof baking pan. Top with tomato sauce and your favorite pizza toppings. Sprinkle with some oregano and mozzarella cheese. Bake at 400F until the topping is hot and cheese is bubbly, about 20 minutes.
* Incorporate cooked spaghetti squash into your favorite pasta casserole in place of the pasta.
* If you roast spaghetti squash whole (not cut it half), make sure you poke a few holes in it with a fork for the steam to escape or you just may end up with a squash explosion to clean up!
* 1 pound of squash yields about 1-½ cups cooked spaghetti squash.
* Microwaving spaghetti squash will yield a softer “pasta” with shorter strands, while baking squash will yield more of an al dente bite to the squash with longer strands.
* Check the doneness of squash by pressing on the skin. It should give slightly when the squash is tender and cooked.
* If you don’t have a sharp knife for cutting the raw squash in half, you can pierce the squash a few times, the microwave it on high for 2 minutes. It will be easier to slice this way before roasting.
Herbs/Spices That Go Well With Spaghetti Squash
Basil, bay leaf, black pepper, cilantro, garlic, ginger, parsley, pesto, salt, rosemary, sage, soy sauce, sugar, thyme
Other Foods That Go Well With Spaghetti Squash Proteins: Bacon, beans, eggs, lentils, pork, sausage, seafood, toasted nuts, walnuts
Dairy: Butter and browned butter, cheese, cream
Vegetables: Bok choy, broccoli, carrots, fennel, mushrooms, onions, parsnips, peppers (bell and chiles), scallions, tomatoes, zucchini
About Judi
Julia W. Klee (Judi) began her journey enjoying “all things food” in elementary school when she started preparing meals for her family. That love of food blossomed into a quest to learn more and more about health and wellness as related to nutrition. She went on to earn a BS Degree in Food and Nutrition, then an MS Degree in Nutrition. She has taught nutrition and related courses at the college level to pre-nursing and exercise science students. Her hunger to learn didn’t stop upon graduation from college. She continues to research on a regular basis about nutrition as it relates to health. Her hope is to help as many people as possible to enjoy foods that promote health and wellness.