Monthly Archives: abril 2019

Dragon Fruit

Dragon Fruit – A Review

Dragon fruit are increasing in popularity right now. I was recently grocery shopping and found one in the grocery store. I had never seen such a thing, nor heard of it before. I HAD to buy it and try it out for myself. I did some research and produced two videos with my lovely specimen, one sharing basic information about dragon fruit, and the other showing how to cut it. Below are links to those videos. Following the video links is my complete review of the dragon fruit itself. This may be helpful to you if you’re interested in trying one for yourself. I hope this helps!

Enjoy!
Judi

Here’s my video sharing a lot of basic information about dragon fruit:

Here’s my video showing how to cut a dragon fruit, and what it looks like inside:

My complete review of the dragon fruit…

What is a dragon fruit?
It’s the fruit of a climbing cactus plant, and is related to a prickly pear. It is grown all over the world. The two most common types have bright red (or hot pink) skin with green scales. The most common has white flesh inside with many black seeds (resembling kiwi seeds). The lesser common type has red flesh, also with many black seeds. The one I bought had white flesh. I had no idea which type I was buying because the sign for it had no such information. Mine came from Vietnam.

It is noteworthy to know that the rind or skin of the dragon fruit is NOT edible, so be sure that is not included in whatever you’re doing with your dragon fruit.
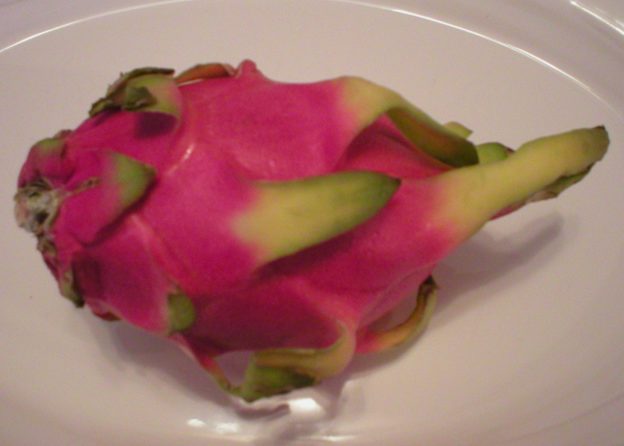
Appearance
Needless to say, its appearance caught my attention and lured me into purchasing it, even though I had no idea what on earth it was! It’s appearance makes it very intriguing. It’s described as having a red rind, but actually it’s more like a strong hot pink color. It has green extensions on it that look “thorn-ish” but they are not sharp.

When cut, the dragon fruit either has white or red pulp inside with many black seeds. It resembles a kiwi (but the flesh is not green, but either white or red) with the tiny seeds in it.

How to Tell if It’s Ripe
When I purchased mine, I had no idea what I was getting. From what I’ve researched, it’s ripe when it has a slight “give” to it when squeezed (similar to an avocado). A hard one is unripe and should be left on the kitchen counter for a few days to allow it to ripen. When I learned this, I tested mine and it did not feel hard, so I assumed it was ripe. Perhaps not. Again, since I was a dragon fruit novice, it seemed OK to cut since it did not feel hard (Maybe this was my imagination?).

Cost
This fruit is mighty expensive for what you get. It does not keep well (no more than a day after being cut), so it’s basically a one-time cut and eat fruit. It can easily be shared between two or three people, or can be added to smoothies or a salsa to make it go further. However, it’s expensive. Mine cost $5.00 (well…$4.98 to be exact). For what you get for your money, you have to LOVE it to make that worth the cost, unless you have plenty of money to toss around!

Texture
The texture is very much like that of a kiwi. The flesh is soft and very easy to cut with a knife or even scoop out with a spoon. The softness led me to believe mine was ripe enough to eat, even though I had never cut into one before. Maybe not.

Flavor
I was shocked when I took a bite of the dragon fruit. It was juicy and soft, but had absolutely NO flavor whatsoever! None, zip, nada, no flavor at all! When I purchased it, the cashier was very familiar with dragon fruit and commented (very sincerely) that the fruit was delicious and that she often included it in a smoothie with mango. I had no reason to believe she was lying to me. She did comment that she purchased hers from the local Asian market. After doing my research, I’m inclined to believe the cashier was used to eating dragon fruit with the reddish flesh rather than the white flesh. From my research, I learned that the red flesh fruit is sweeter than the white flesh. So, perhaps those who manage Asian markets know more of what they’re getting than American grocery store produce managers. Maybe.

When I went shopping the next week, I found that same cashier. I asked her if she ate dragon fruit with the white or red pulp. She said she had only eaten those with red pulp. This confirms what I read…that the red pulp was sweeter than the white pulp. She was shocked when I told her that it had no flavor at all. She also said she always purchased hers at the local Asian market and they were always red inside. It seems like “those in the know” make a point of buying the red pulp variety.

Potential Reactions
In my research, I learned that in some rare cases, people can have an allergic reaction to dragon fruit. It’s advisable to try only a few bites of it at first, if you’ve never had it before. I MIGHT be one of those reactive people. Because of this warning, I tried only a few bites and it didn’t take long before my mouth felt warm and a bit numb. I don’t think I ate any of the rind (which is not edible). I even felt the “warmness” down into my esophagus not long after swallowing the fruit.

I don’t normally react in such a way to foods. In fact, I can’t think of ever reacting that way to anything in the past. I originally intended to share it with my husband in a fruit salad. However, he’s more reactive to food than I am. After experiencing my possible reaction to it, I decided not to share it with my husband for fear he would have a worse reaction. I’m sorry to say that it all went into the trash because of that. $5.00 literally thrown away.

Maybe, just maybe I wouldn’t react to one with red pulp. I really don’t know!

Do I recommend that you try one?
Actually despite my experience, yes, I do recommend that you try one. However, I suggest you purchase one at a local Asian market, if you have one near you. AND/OR I also suggest you ask if has red or white flesh inside. It seems like the red flesh variety is the way to go here. I believe it’s worth trying just about anything at least once. After all, how would you know if you like it or not if you don’t run it by your taste buds? (Just don’t ask me to try anything with bugs…they’re not on my menu!) So, splurge and give dragon fruit a try. Know what you’re looking for and how to pick one out. That should give you an advantage over my personal experience, and maybe you’ll find a new delicacy to add to your food list!

About Judi
Julia W. Klee (Judi) began her journey enjoying “all things food” in elementary school when she started preparing meals for her family. That love of food blossomed into a quest to learn more and more about health and wellness as related to nutrition. She went on to earn a BS Degree in Food and Nutrition, then an MS Degree in Nutrition. She has taught nutrition and related courses at the college level to pre-nursing and exercise science students. Her hunger to learn didn’t stop upon graduation from college. She continues to research on a regular basis about nutrition as it relates to health. Her hope is to help as many people as possible to enjoy foods that promote health and wellness.

Artichoke

Artichokes 101 – The Basics

Artichokes are an interesting item found in the produce section of some grocery stores. Many of us have no idea what to do with them. Yet they have been enjoyed as food since ancient times. A little know-how can go a long way when preparing these flower buds. In the video below, I cover the basics of what artichokes are, how to prepare them, cook them and enjoy them, and more. To access my video notes, please see below the video link. Enjoy!

I hope this helps!
Judi

Artichokes 101 — The Basics

About Artichokes
The globe artichoke (also known as French or green artichoke) is a flowering bud of a thistle plant. It is believed to be native to the Mediterranean area. We typically eat the flower buds of the plant before they come into bloom, and also the “heart” or the base of the plant. The mention of the artichoke as a garden plant goes back as far as the 8th century BC. Ancient Greeks and Romans are known to have enjoyed it as a food. Today, artichokes are grown in Europe, South America, and the United States, with California producing almost all of the artichokes consumed in this country.

Nutrition Tidbits
Artichokes are an excellent source of fiber, vitamin C, folate, magnesium. They are also good source of vitamin B complex, vitamin K, vitamin E, calcium, iron, phosphorus, potassium, sodium and zinc. Artichokes also contain high levels of antioxidants, so they are VERY healthful vegetables to eat!

How to Select Artichokes
Choose artichokes that are heavy for their size, with bright green leaves, and tightly compacted leaves. Avoid those with discolored or brown-tipped leaves or with a dried brown stem. The smaller heads are more tender than larger ones.

How to Store Artichokes
Store unwashed artichokes in the refrigerator in a plastic bag. They should keep for about a week.

How to Preserve Artichokes
Artichokes can be frozen. But, they should not be frozen raw since they will become discolored and have a poor flavor when cooked. To prepare them for freezing, remove all of the outer leaves and the fuzzy choke, leaving the pale, inner leaves attached to the base or heart. Trim the tops and stems. Wash the hearts in cold water and drain well.

Blanch the trimmed artichokes in a mixture of 1/2 cup lemon juice or 1 tablespoon of ascorbic acid to 2 quarts water. Boil small artichokes for 3 to 5 minutes, and medium sized artichokes for 7 minutes. Place face down on a towel to drain. Placed the drained pieces on cookie sheets, face-side up, in the freezer until fully frozen. Once frozen, place desired portions into suitable containers and return to the freezer. Steamed artichokes can also be wrapped in foil, placed in plastic bags and frozen whole. Frozen artichokes should keep for 6 to 8 months.

To thaw artichokes, remove them from the freezer and wrap them tightly in aluminum foil. Place the artichokes in foil over steaming water until thawed and cook as desired.

Fresh vs Frozen vs Canned
More people eat the tender artichoke hearts than those who eat the leaves. This makes frozen and canned artichoke hearts excellent, convenient choices. Choosing canned or frozen artichoke hearts can save money and time in the kitchen, and is often the preferred way to enjoy artichokes.

This website provides an excellent comparison of frozen vs canned artichoke hearts, how to prepare them, along with some proven serving suggestions. It’s well worth visiting if you’re serious about eating artichoke hearts… https://www.thecitycook.com/articles/2011-03-31-canned-and-frozen-artichokes-101

How to Prepare Artichokes
First peel away the loose petals at the base by the stem. Cut the stem away at the base of the artichoke, leaving about one-fourth of an inch. Trim the top points by cutting away an inch from the top to expose the inner part of the petals. Use kitchen shears to trim the thorns from the outer petals. Rinse under cold, running water to remove any trapped dirt or debris, or soak briefly in a bowl of lukewarm water. Allow them to drain upside down on a towel to remove trapped water. Rub a cut lemon half against the trimmed parts of the artichoke or place them in a bowl of lemon juice with water to prevent browning.

Whether you are cooking and serving it whole, or removing the leaves first, the fuzzy choke deep inside must be removed and discarded. It is not edible. The prized “heart” of the artichoke if found below the fuzzy, prickly thistle or “choke.”

Cooking/Serving Methods
When cooking artichokes, avoid using iron or aluminum cookware because they can discolor the artichokes and change the flavor. Instead, use glassware, stainless steel, or enamelware cookware to prepare artichokes. Also, they tend to turn brown easily, so adding some lemon juice to them or to the cooking water will help to prevent that reactions. The following cooking suggestions are provided by https://producemadesimple.ca

To boil, place trimmed whole artichokes in a deep pot and fully submerge in cold water seasoned with 1 tablespoon of salt, 1 tablespoon of lemon juice and 2 of your favorite fresh herb sprigs like thyme or basil [optional]. Boil artichokes for 30 to 40 minutes, depending on their size, just until tender. They are done when you can insert a sharp knife with little pressure.

To steam, place trimmed whole artichokes on a steaming insert in a pot filled with water barely touching the bottom of the insert. Steam for about 45 minutes, or until you can easily pull away a petal from the base. Depending on size, cooking times will vary.

To roast, after trimming, slice artichokes vertically in half. Use a spoon to scrape out the fuzzy choke, rub the cut side with half a lemon, drizzle with olive oil and season with garlic powder, salt and pepper. Roast at 375ºF cut side down on a baking sheet until tender, about 30 to 40 minutes. Serve cut side up with grated Parmesan cheese.

To grill, after trimming sliced artichokes in half vertically, remove the fuzzy choke and submerge in a bowl of water mixed with the juice of a lemon. This will keep artichokes from turning brown while you prep the remaining other ones. Bring a large pot of water to a boil, add artichokes. Boil for about 15 minutes, or until slightly firm. Remove from the pot and drain. Drizzle with olive oil, more lemon juice, garlic powder, salt and pepper and finish on the grill, cooking for 5 to 10 minutes, while turning the artichokes often to prevent burning.

To microwave, after trimming place whole artichokes in a microwavable baking dish with enough water to almost submerge and cover. Microwave on high for 20 to 30 minutes until tender. Cooking times may vary based on microwave and size of artichoke.

To enjoy, remove the pedals of the artichoke and arrange them around your favorite dip. Meanwhile, prepare the heart of the artichoke by twisting off the small tender inner leaves to reveal the soft, fuzzy but inedible choke. Use a spoon to scrape out the choke to reveal the soft fleshy base of the artichoke known as the “heart”. Serve with melted butter as a side dish.

Artichokes are served as a hot vegetable often with a sauce or as a cold salad or appetizer. To eat it, break off the leaves and slide a leaf between your teeth to remove the softer edible portion.
The following are some artichoke serving ideas from the website https://producemadesimple.ca/goes-well-artichokes/

• Use melted butter, garlic butter, or hollandaise as a dipping sauce for hot artichokes.
• Blend artichoke hearts with sautéed spinach, sour cream, cream cheese and parmesan cheese to make a dip for pita chips or your favorite cracker.
• Add artichoke hearts to a grilled cheese sandwich or pizza, or stuff them for an impressive and beautiful dish.
• Toss artichoke hearts, celery and parmesan together for a modern update on a regular green salad.
• Here’s an inspired idea: deep fry artichoke leaves in beer batter and serve with a creamy, herb dipping sauce.

Herbs/Spices That Go Well With Artichokes
Olive oil, salt, pepper, thyme, lemon pepper, and basil

Foods That Go Well With Artichokes
Dairy: melted butter, cream cheese, goat cheese, sour cream, cream sauces, Parmesan cheese, and feta cheese

Produce: spinach, lemon, garlic, onion, avocado, eggplant, sundried tomatoes, shallots, potatoes and arugula

Protein: chicken, fish, seafood, and eggs

Other: hollandaise sauce, mayonnaise, bread, pasta, beans, lentils and peas

Recipe Links
Artichoke and Spinach Dip https://www.southernliving.com/recipes/artichoke-and-spinach-dip-recipe

Stuffed Baked Artichokes https://producemadesimple.ca/stuffed-baked-artichokes/

The Most Amazing Roasted Artichokes https://www.gimmesomeoven.com/amazing-roasted-artichokes/

Mediterranean Roasted Artichokes https://www.themediterraneandish.com/Mediterranean-roasted-artichoke-recipe/

How to Cook and Eat an Artichoke https://www.simplyrecipes.com/recipes/how_to_cook_and_eat_an_artichoke/

20 Amazing Artichoke Recipes http://www.californiagrown.org/blog/20-amazing-artichoke-recipes/

Roasted Whole Artichokes https://www.thespruceeats.com/simple-roasted-artichokes-recipe-102108

Artichoke Pesto Pasta https://bitesofwellness.com/artichoke-pesto-pasta-sunday-supper/

Whole30 Spinach Artichoke Dip https://bitesofwellness.com/whole30-spinach-artichoke-dip/

Easy Paleo Artichoke Hummus https://bitesofwellness.com/easy-paleo-artichoke-hummus/

Paleo Artichoke Pesto Hummus https://bitesofwellness.com/paleo-artichoke-pesto-hummus/

Steamed Whole Artichokes https://www.foodnetwork.com/recipes/tyler-florence/steamed-whole-artichokes-recipe-1938266

The Ultimate Stuffed Artichoke Recipe https://cookingontheweekends.com/the-ultimate-stuffed-artichoke-recipe/

24 Recipes for Artichokes, Both Fresh and Jarred https://www.bonappetit.com/recipes/slideshow/artichoke-recipes

About Judi
Julia W. Klee (Judi) began her journey enjoying “all things food” in elementary school when she started preparing meals for her family. That love of food blossomed into a quest to learn more and more about health and wellness as related to nutrition. She went on to earn a BS Degree in Food and Nutrition, then an MS Degree in Nutrition. She has taught nutrition and related courses at the college level to pre-nursing and exercise science students. Her hunger to learn didn’t stop upon graduation from college. She continues to research on a regular basis about nutrition as it relates to health. Her hope is to help as many people as possible to enjoy foods that promote health and wellness.

Resources
https://en.wikipedia.org/wiki/Artichoke

http://topfoodfacts.com/16-interesting-facts-about-artichokes/

http://justfunfacts.com/interesting-facts-about-artichokes/

https://www.southernliving.com/food/how-to/in-season-artichokes

https://producemadesimple.ca/stuffed-baked-artichokes/

https://producemadesimple.ca/goes-well-artichokes/

https://producemadesimple.ca/artichokes/

https://www.thecitycook.com/articles/2011-03-31-canned-and-frozen-artichokes-101

https://www.thriftyfun.com/tf73359897.tip.html

Dragon Fruit

Dragon Fruit 101 – The Basics

Dragon fruit are gaining in popularity. I recently found one in the grocery store and had never seen one before. I HAD to buy it and do a little research on it, then test it out myself. So, I’m sharing that with you. Below are video links where I share basic information about dragon fruit and also how to cut one. I also have another blog post where I did a complete review of the fruit itself. My 101-video notes are below the video links. I hope this helps!!

Enjoy!
Judi

Dragon Fruit 101 – The Basics

About Dragon Fruit
Dragon fruit grows on the Hylocereus cactus, also known as the Honolulu queen, whose flowers only open at night. It is the fruit of a climbing cactus, so it’s related to prickly pears. The plant is native to southern Mexico and Central America, but now it is grown all over the world. It has different names, including pitaya, pitahaya and strawberry pear.

The two most common types have bright red skin with green scales. The most common type has white pulp with black seeds. Another less common type has red pulp and black seeds. The red pulp variety is a bit sweeter than the white pulp fruit. There is also a yellow dragon fruit that has yellow skin and white pulp with black seeds. Its flavor has been described as a slightly sweet cross between a kiwi and a pear.

Nutrition Tidbits
Dragon fruit is a good source of fiber, magnesium, and other nutrients as well. The red flesh variety has a little higher nutritional value with added carotene, which helps in eye health and immune function. It is considered to be a low-calorie fruit with about 60 calories in a 3.5 ounce serving. It does contain some antioxidants that are known to help protect fatty acids from free radical damage.

Dragon fruit’s fiber and antioxidants have been shown to reduce insulin resistance and fatty liver disease. Its prebiotic fiber has been shown to help promote healthful gut bacteria. These properties make dragon fruit helpful in treating diabetes, heart disease, digestive issues, and even preventing some cancers.

In rare cases, people have had allergic reactions to dragon fruit. So, if you’ve never had it before, try a small amount at first, just to be sure. Signs of an allergic reaction include tingling or itchy feeling in the mouth, hives, swelling of the lips or tongue, nausea or vomiting.

How to Select Dragon Fruit
Select a ripe fruit with bright, evenly colored skin, that gives a little when squeezed. A very firm dragon fruit will ripen up on the counter after a few days.

Freeze-dried pitaya powder is also available commercially.

How to Store Dragon Fruit
Dragon fruit can be stored on the counter for a few days. Store ripe dragon fruit in a plastic bag in the refrigerator.

How to Preserve Dragon Fruit
Once cut, it should be stored in a tightly sealed container in the refrigerator. It will keep this way for only a day or so. If it begins to turn brown or gets mushy, it’s time to discard it.

How to Prepare Dragon Fruit
With a sharp knife, cut it in half lengthwise. The pulp can be spooned out or the peel can be removed with a knife and the fruit cut into desired size pieces. The skin of the dragon fruit is not edible, although some people will use the skin of half of a dragon fruit as a little serving dish for the inside flesh of the fruit.

Cooking/Serving Methods
Dragon fruit is eaten raw. It can be cut up and eaten as it is, or cut into bite-size pieces and topped with yogurt and nuts, or added to a salad. It is also used in salsas, smoothies, drinks, sorbets, and mixed into sauces served on fish.

Dragon fruit would be excellent in a fruit salad mixture including pineapple, kiwi, blueberries, and/or strawberries. Topping that with yogurt would be delicious!

Foods That Go Well With Dragon Fruit
Dragon fruit pairs perfectly with fish dishes, particularly cod, tuna, and mahi-mahi. Serve the fruit whole on the side or drizzle your dish with a sauce or chunky salsa.

Also dragon fruit goes well with lemon, mango, strawberry, milk, yogurt, chia seeds, pancakes.

Recipe Links
Berry Dragon Fruit Smoothie https://gratefulgrazer.com/home/recipes/dragon-fruit-smoothie/

9 Healthy and Creative Dragon Fruit Recipes https://dailyburn.com/life/recipes/dragon-fruit-pitaya-recipes/

Dragon Fruit Recipes and Ideas https://wiki.ezvid.com/m/foods-that-go-well-with-dragon-fruit-IcWxQEn_iQjU1

Atlantic Cod with Dragon Fruit Coulis https://www.sizzlefish.com/blogs/recipes-to-try/atlantic-cod-with-dragon-fruit-coulis

Fajita-Spiced Shrimp Tacos with Dragon Fruit Salsa https://www.chocolatemoosey.com/2014/05/12/fajita-spiced-shrimp-tacos-with-dragon-fruit-salsa/

Dragon Fruit Salad https://wanderspice.com/dragon-fruit-salad/

Dragon Fruit and Guava Popsicles https://senseandedibility.com/dragonfruit-guava-popsicles/

Dragon Fruit Tastes Amazing in These 23 Fruity Recipes https://youshouldgrow.com/dragon-fruit-taste-recipes/

About Judi
Julia W. Klee (Judi) began her journey enjoying “all things food” in elementary school when she started preparing meals for her family. That love of food blossomed into a quest to learn more and more about health and wellness as related to nutrition. She went on to earn a BS Degree in Food and Nutrition, then an MS Degree in Nutrition. She has taught nutrition and related courses at the college level to pre-nursing and exercise science students. Her hunger to learn didn’t stop upon graduation from college. She continues to research on a regular basis about nutrition as it relates to health. Her hope is to help as many people as possible to enjoy foods that promote health and wellness.

Resources
https://www.healthline.com/nutrition/dragon-fruit#what-it-is

https://www.healthline.com/nutrition/dragon-fruit#antioxidants

https://www.everydayhealth.com/diet-nutrition/diet/dragon-fruit-how-eat-benefits-taste-more/

https://draxe.com/dragon-fruit-benefits/

https://www.organicfacts.net/health-benefits/fruit/health-benefits-of-dragon-fruit.html

https://www.thespruceeats.com/dragon-fruit-overview-nutritional-information-3217090

https://wiki.ezvid.com/m/foods-that-go-well-with-dragon-fruit-IcWxQEn_iQjU1

https://www.chowhound.com/food-news/203053/how-to-cook-with-dragon-fruit/

https://www.quora.com/Whats-the-difference-between-red-dragon-fruit-and-white-dragon-fruit

Fermented Cauliflower

Easy Fermented Cauliflower

I’ve been enjoying fermented vegetables with my salads and other meals for quite some time. After trying a series of fermentation methods, some with success and some without, I’ve settled on this really simple way to ferment vegetables. For me, it’s been a no-fail method with success literally 100 percent of the time. In the video below I detail how I ferment cauliflower. This same method could be used to ferment just about any fresh vegetable you want. Enjoy!

I hope this helps,
Judi

About Judi
Julia W. Klee (Judi) began her journey enjoying “all things food” in elementary school when she started preparing meals for her family. That love of food blossomed into a quest to learn more and more about health and wellness as related to nutrition. She went on to earn a BS Degree in Food and Nutrition, then an MS Degree in Nutrition. She has taught nutrition and related courses at the college level to pre-nursing and exercise science students. Her hunger to learn didn’t stop upon graduation from college. She continues to research on a regular basis about nutrition as it relates to health. Her hope is to help as many people as possible to enjoy foods that promote health and wellness.

Cauliflower

How to Cut a Cauliflower

If you’re not familiar with them, cutting up a fresh cauliflower can be an intimidating task! It’s a compact globe surrounded by tightly adhering leaves and stems. By appearance, there’s no starting point! In the video below, I show how to easily tackle that daunting cauliflower.

I hope this helps!
Judi

About Judi
Julia W. Klee (Judi) began her journey enjoying “all things food” in elementary school when she started preparing meals for her family. That love of food blossomed into a quest to learn more and more about health and wellness as related to nutrition. She went on to earn a BS Degree in Food and Nutrition, then an MS Degree in Nutrition. She has taught nutrition and related courses at the college level to pre-nursing and exercise science students. Her hunger to learn didn’t stop upon graduation from college. She continues to research on a regular basis about nutrition as it relates to health. Her hope is to help as many people as possible to enjoy foods that promote health and wellness.

Cauliflower

Cauliflower 101 — The Basics

Cauliflower is growing in popularity in the United States. With the low-carb movement, people are discovering ingenious new ways to prepare this vegetable that our grandmothers would never have dreamed of! In the video below, I cover a lot of basic information about this interesting cruciferous vegetable, from what it is, to nutritional aspects, to how to prepare it and what foods and flavorings go well with it. To see my notes, please look below the video. Enjoy!

I hope this helps!
Judi

Cauliflower 101 – The Basics

About Cauliflower
Cauliflower is a member of the cruciferous vegetable family, so it is related to cabbage, kale, Brussels sprouts, broccoli, and other such vegetables. There are many different types of cauliflower, including different colors in orange, green and purple. In the United States, most cauliflower sold is white with a fairly large compact head (or “curd”) with undeveloped flower buds that resemble broccoli florets.

The history of cauliflower dates back about 2,000 years. It appears to have originated in the area of modern day Turkey. Many cultures prefer a loose curd variety of cauliflower over the tight compact head type often seen in our grocery stores. Cauliflower is more popular in other parts of the world than in America, although popularity is increasing with the new ways of preparing it with the “low carb” trend. China and India produce 74% of the world’s cauliflower.

Nutrition Tidbits
Like other vegetables in the cruciferous family, cauliflower is low in calories and high in specific nutrients. One cup of raw cauliflower has only 25 calories, 3 grams of fiber, 77% of the RDI for Vitamin C, 20% of the RDI for Vitamin K, and notable amounts of some B vitamins and potassium, manganese, magnesium, and phosphorus.

Also like other members of the cruciferous family, cauliflower is high in antioxidants that help to boost our immunity, reduce inflammation, and help to protect against cancer and heart disease. Cauliflower also is one of the plant foods (along with its cousin broccoli) that contains choline, a compound that protects our nervous system and helps ward off dementia and Alzheimer’s disease.

Many people who are following low carbohydrate diets are now using cauliflower in ingenious ways to create interesting food alternatives such as cauliflower rice, pizza crust, hummus, tortillas, and mashed in place of potatoes.

To learn more about the nutritional wonders of cauliflower, visit Dr. Michael Greger’s website, https://nutritionfacts.org/ and watch some of his videos where cauliflower is discussed https://nutritionfacts.org/?s=cauliflower

How to Select Cauliflower
Look for cauliflower with a clean, firm, compact head that is creamy white in color. It should feel heavy for its size. Avoid those that are soft, have brown areas, or dark spots on the curds. Those with more leaves will usually be fresher.

How to Store Cauliflower
Store uncooked cauliflower in a plastic bag in the refrigerator. Place it stem side down to protect the florets from excessive moisture. It will usually keep well in the refrigerator for 3 to 5 days.

How to Preserve Cauliflower
Fresh cauliflower can be frozen, fermented, pickled, and dehydrated.

To freeze cauliflower: Blanch cauliflower pieces for 3 minutes in boiling water, or steam for 3 to 5 minutes, depending on the size of the pieces. Then immediately place it in ice water to quickly cool it down. Leave the cauliflower in the ice water for as long as it was boiled or steamed. Then drain well and place in freezer containers or bags. It will keep for 10 to 12 months in the freezer. Here’s a link to an excellent explanation on how to freeze cauliflower. http://pickyourown.org/freezing_cauliflower.htm

Fermented cauliflower: The website https://www.culturesforhealth.com is renowned for information and products for culturing foods. At this link, they share a way to ferment cauliflower with carrots and garlic: https://www.culturesforhealth.com/learn/recipe/lacto-fermentation-recipes/lacto-fermented-cauliflower-carrots-garlic/

Pickled cauliflower: Cauliflower pickles can be added to salads or used to flavor or accompany many foods. Here’s a delicious-sounding recipe with instructions on how to pickle cauliflower: https://www.freshpreserving.com/pickled-cauliflower-br2760.html

Here’s another link with instructions on making quick refrigerator cauliflower pickles or canning pickles https://www.finecooking.com/recipe/pickled-cauliflower-with-carrots-red-bell-pepper

Dehydrated cauliflower: There is mixed information available on how and even whether cauliflower should be dehydrated. Some sources say it doesn’t need to be blanched; however, when you read the “fine print” they do state that it will darken after being dried if not blanched. Others state it should be blanched first, which I agree with, since blanching will stop the enzyme activity that will continue the aging process even after being dried. Follow your dehydrator manufacturer’s instructions on how to dry cauliflower in your machine.

Fresh vs Frozen
Cauliflower is available in most grocery stores both fresh and frozen. Fresh cauliflower is obviously more versatile than frozen, since it can be used both raw and cooked. Frozen cauliflower is a great convenience since it’s already washed, cut up and blanched. It will only be suitable for use in cooked dishes, but since it’s already blanched, it will require very little cooking time. Overcooking frozen cauliflower will make it soggy and mushy, so cook it quickly with as little water as possible (if you’re using water).

How to Prepare Cauliflower
The simplest way to wash cauliflower is to cut or break it into desired size pieces, then wash it. First, remove the leaves then remove the florets by cutting the central stem out where it meets the floret stalks. The florets can easily be removed and cut down or broken into smaller pieces, if desired.

If you are making cauliflower “steaks” then simply cut through the entire head into the desired width of slices needed for your recipe. The leaves and any undesired stem pieces can easily be removed after slicing.

Submerge the pieces into a bowl of water to rinse away any dirt or tiny insects that may be in there. It would be unusual to find insects in grocery store-purchased cauliflower. However, if the cauliflower was picked from your garden or bought at a farmer’s market, insects may be among the florets. In this case, soak your prepared pieces for 15 minutes in a bowl of salt water or a bowl of water with either lemon juice or vinegar mixed in. This will kill any insects that are lurking inside and also helps to remove any trapped dirt. After soaking, rinse the cauliflower well in fresh water, then proceed with your recipe.

Most people just eat the cauliflower florets. However, the stems and leaves are also edible, so include them if you want to enjoy the full benefit of the vegetable. Some people reserve the leaves and stems for soups or vegetable stock.

If you are opting to cook the cauliflower whole, then submerge the entire head for 15 minutes in a bowl of water, or one with salt or vinegar added, depending on where it was purchased. Rinse it well under running water afterward.

How is it usually eaten…raw or cooked?
Although cauliflower is edible both raw and cooked, it seems that Americans enjoy this vegetable cooked more than raw. Roasting has been the latest favorite way to prepare cauliflower.

Cooking/Serving Methods
Like broccoli, cauliflower contains sulfur compounds that can be released with extended cooking. To prevent that strong sulfur odor and flavor, cook cauliflower quickly and with as little water as possible. This will also help to retain its crispness.

Cauliflower can be boiled, steamed, roasted in bite-size pieces or steaks, sautéed, stir-fried, made into soups, crumbled into rice, mashed like potatoes, braised, added to stews, battered and fried, added to casseroles, baked into mock bagels, breads and muffins, and served raw in salads.

Below are some serving ideas from the website https://producemadesimple.ca/goes-well-cauliflower/

Cauliflower Serving Ideas:
• Top hot cooked cauliflower with melted butter and season with your choice of chives, dill, nutmeg, minced parsley, or lemon juice for a delicious side dish.
• Try roasting it with a drizzle of olive oil and your favorite seasonings. Nuts pair nicely with cauliflower and can be roasted alongside the florets, if desired. Toss together in a bowl before serving.
• Raw cauliflower is delicious on a crudité platter and makes a crunchy addition to seasonal salads.
• Add chopped cooked cauliflower to a quiche, or stir it into scrambled eggs.
• Roast cauliflower and broccoli together, tossed with garam masala and olive oil.
• Cauliflower can be used to create kid-friendly dishes thanks to its ability to take on the flavors and seasonings of a recipe.
• Cut down on the carb content of decadent dishes like pizza and pasta by replacing the flour, grain or glutinous component with cauliflower.
• Bring classic Indian flavors to the table with a cauliflower aloo gobi.

Herbs/Spices That Go Well With Cauliflower
Basil, bay leaf, cardamom, chervil, chives, cilantro, cinnamon, coriander, cumin, dill, garam masala, ginger, marjoram, mint, mustard, nutmeg, oregano, paprika, parsley, saffron, tarragon, thyme, and turmeric

Foods That Go Well With Cauliflower
Because of its neutral flavor, cauliflower goes well with just about anything. It’s only limited to your imagination! Here are some suggestions:

Produce: apples, asparagus, bell pepper, bok choy, broccoli, Brussels sprouts, carrots, celery, citrus, corn, garlic, lime, lemon, kale, mango, mushrooms, olives, onions, peas, potatoes, pumpkin, sweet potatoes, spinach, squash, and tomatoes

Dairy: yogurt, cream, milk, blue cheese, cheddar cheese, feta cheese, Gruyere cheese, Parmesan cheese, browned butter, and butter

Other: beef, anchovies, pork, tofu, chickpeas, grains, pine nuts, walnuts, seeds, rice, almonds, tahini, and wine

Recipe Links
Asian Sautéed Cauliflower http://www.whfoods.com/genpage.php?tname=recipe&dbid=182

Cauliflower, Fennel and White Bean Winter Salad https://www.thekitchn.com/recipe-cauliflower-fennel-and-74484

Five Ways to Eat Cauliflower https://www.thekitchn.com/five-ways-to-eat-cauliflower-99565

Recipe Roundup: Roasted Cauliflower (links to many recipes for roasted cauliflower) https://www.thekitchn.com/recipe-roundup-roasted-caulifl-74401

25 Ways to Cook with Cauliflower https://www.tasteofhome.com/collection/ways-to-cook-with-cauliflower/

Everything Bagel Style Cauliflower Rolls https://thefeedfeed.com/lexiscleankitchen/everything-bagel-style-cauliflower-rolls

Everything Bagel Cauliflower Steaks https://itdoesnttastelikechicken.com/everything-bagel-cauliflower-steaks/

Roasted Garlic Cauliflower https://www.allrecipes.com/recipe/54675/roasted-garlic-cauliflower/

Cauliflower Parmesan Crisps https://www.willcookforsmiles.com/cauliflower-parmesan-crisps/

Our 41 Best Cauliflower Recipes https://www.epicurious.com/ingredients/our-favorite-cauliflower-recipes-gallery

Crispy Sea Salt & Vinegar Cauliflower “Popcorn” https://www.blissfulbasil.com/crispy-sea-salt-vinegar-cauliflower-popcorn/#wprm-recipe-container-23883

30 Life-Changing Cauliflower Recipes for Every Comfort Food Craving https://blog.bulletproof.com/cauliflower-recipes-keto-paleo-2g3c/

13 Healthy Cauliflower Recipes https://health.facty.com/food/nutrition/13-healthy-cauliflower-recipes/?utm_source=adwords&utm_medium=c-search&utm_term=cauliflower%20recipes&utm_campaign=f-h-13-healthy-cauliflower-recipes&gclid=Cj0KCQiAk-7jBRD9ARIsAEy8mh50R8Si3aHqZtGX266QI_icxPG4IXNrHiUVaQkazB7dFEBZXomlkgIaAk2ZEALw_wcB

About Judi
Julia W. Klee (Judi) began her journey enjoying “all things food” in elementary school when she started preparing meals for her family. That love of food blossomed into a quest to learn more and more about health and wellness as related to nutrition. She went on to earn a BS Degree in Food and Nutrition, then an MS Degree in Nutrition. She has taught nutrition and related courses at the college level to pre-nursing and exercise science students. Her hunger to learn didn’t stop upon graduation from college. She continues to research on a regular basis about nutrition as it relates to health. Her hope is to help as many people as possible to enjoy foods that promote health and wellness.

Resources
http://www.whfoods.com/genpage.php?tname=foodspice&dbid=13

http://www.berkeleywellness.com/healthy-eating/food/article/types-cauliflower

https://www.healthline.com/nutrition/benefits-of-cauliflower#section5

http://pickyourown.org/freezing_cauliflower.htm

https://www.freshpreserving.com/pickled-cauliflower-br2760.html

https://www.finecooking.com/recipe/pickled-cauliflower-with-carrots-red-bell-pepper

https://www.culturesforhealth.com/learn/recipe/lacto-fermentation-recipes/lacto-fermented-cauliflower-carrots-garlic/

http://www.sweetwater-organic.org/veggies/cauliflower/

https://articles.mercola.com/sites/articles/archive/2014/02/22/cauliflower-health-benefits.aspx

https://articles.mercola.com/sites/articles/archive/2014/02/22/cauliflower-health-benefits.aspx

https://producemadesimple.ca/goes-well-cauliflower/

Roasted Parsnip Fries

Simple Roasted Parsnip Fries

Looking for something different? Try parsnips! They look like white carrots and are usually found in the grocery store not far from their carrot cousins. If you haven’t tried them, parsnips are naturally sweet with a hint of honey flavor. Some describe the flavor as almost nutty. However you describe it, they’re worth a try. Here’s a simple recipe for oven roasted parsnip fries. The recipe is below the video link. I hope this helps!

Enjoy,
Judi

Roasted Parsnip Fries
Makes About 4 Servings

1 lb of fresh parsnips
Up to 1 Tbsp extra virgin olive oil
Salt to taste

Preheat oven to 400F.

Wash and peel the parsnips. Cut a small slice off both ends of each parsnip and discard. Cut them in half crosswise. Cut each half into lengthwise strips, like French fries. Place them in a single layer on a parchment paper lined baking sheet. Drizzle them with oil and sprinkle with salt to taste. Toss them to coat all pieces with the oil and salt. Be sure they are in a single layer and no pieces are on top of others.

Roast in preheated oven for about 20 minutes. Remove the pan and toss the fries to turn them over. Be sure they are in a single layer, then return them to the oven. Roast for another 10 minutes (total roasting time about 30 minutes), or until they are as brown as you like. Remove from oven and enjoy!