Here’s an easy and delicious salad recipe that’s a little different than the norm. It would go well with many meals and could also be used on a brunch buffet. The recipe can easily be expanded or made smaller, depending on your needs. Below is a video demonstration of making the salad. The written recipe is below the video link.
Enjoy!
Judi
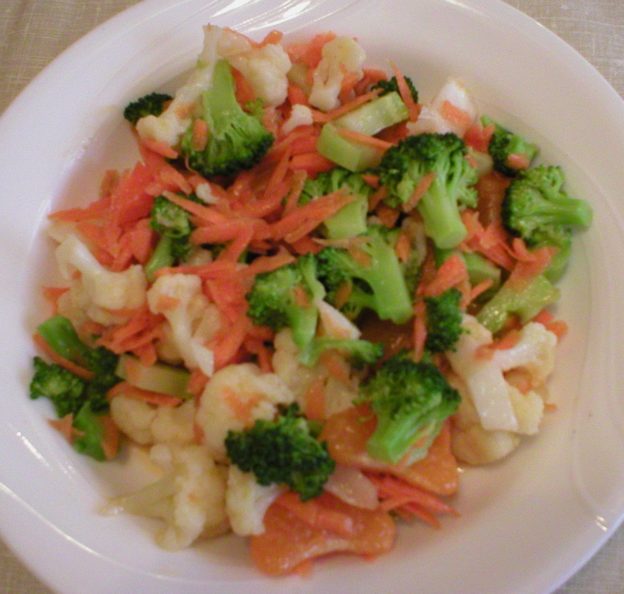
Broccoli Cauliflower Orange Salad
Makes About 6 Servings
1-1/2 cups chopped fresh broccoli*
1-1/2 cups chopped fresh cauliflower*
1 cup shredded fresh carrots*
2 clementine oranges, peeled and sectioned
¼ cup slivered almonds, optional
Dressing
2 Tbsp extra virgin olive oil
2 Tbsp orange juice
1 Tbsp apple cider vinegar
2 tsp honey
1 tsp prepared Dijon mustard, or more to taste
½ tsp onion powder
¼ tsp garlic powder
½ tsp salt, or to taste
Place vegetables, orange sections and almonds (if using them) in a large bowl. Toss to combine and set aside.
Make the dressing: In a small bowl, combine dressing ingredients. Pour over vegetable mixture and toss to combine. Can be served right away, or covered and refrigerated for a while to allow flavors to blend.
*Cook’s notes: There are three options with this salad on how to offer the vegetables:
(1) They can be used raw in the salad.
(2) If you prefer softer vegetables or don’t have access to the fresh vegetables, you could opt for frozen broccoli, cauliflower, and carrots. Place frozen veggies in a colander under running water until thawed (this doesn’t take long). Allow to drain. Cut them into smaller pieces, if needed, then proceed with recipe.
(3) You could use raw vegetables and blanch them by placing them in boiling water, set the timer for 2 minutes. Remove from the hot water when the timer goes off and immediately cool them in ice water. Drain well, then proceed with the recipe.
This simple salad is easy and fast to make, and oh so delicious! It can be made ahead of time, since marinating for a while in the refrigerator allows the flavors to blend, making it that much tastier. Click the video link for a demonstration on making the salad. The recipe is below the video. Enjoy!
I hope this helps!
Judi
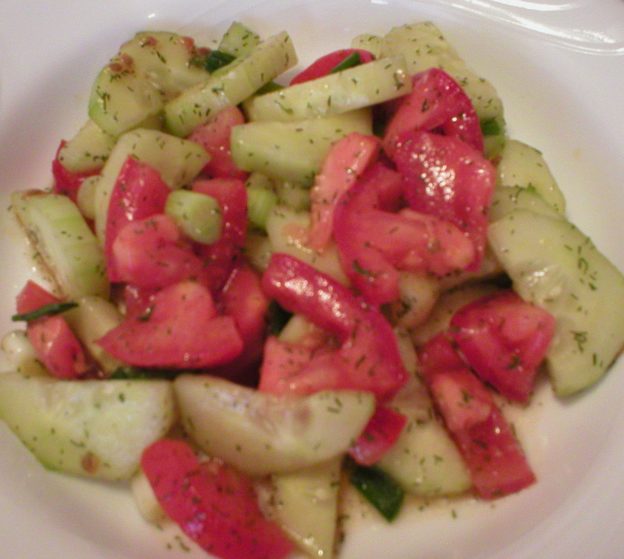
Cucumber Tomato Salad with Dill
Makes About 4 Servings
1 cucumber
2 Roma tomatoes
2 scallions, or 1/3 to ½ cup chopped onion of choice
2 Tbsp extra virgin olive oil
1 Tbsp apple cider vinegar or fresh lemon juice
1/2 tsp dried dill weed (or ½ Tbsp fresh dill weed), or more if desired
Salt to taste
Cut cucumber (peeling is optional), tomatoes, and scallion into bite-size pieces and place in a serving bowl. Top with the olive oil, vinegar or lemon juice, dried dill weed and salt. Toss to combine. Serve or cover and refrigerate until needed.
This salad can be allowed to marinade in a covered container in the refrigerator for up to 24 hours. This gives time for the flavors to blend. It is delicious served immediately but is even better when made in advance.
About Judi
Julia W. Klee (Judi) began her journey enjoying “all things food” in elementary school when she started preparing meals for her family. That love of food blossomed into a quest to learn more and more about health and wellness as related to nutrition. She went on to earn a BS Degree in Food and Nutrition, then an MS Degree in Nutrition. She has taught nutrition and related courses at the college level to pre-nursing and exercise science students. Her hunger to learn didn’t stop upon graduation from college. She continues to research on a regular basis about nutrition as it relates to health. Her hope is to help as many people as possible to enjoy foods that promote health and wellness.
Here’s a really easy recipe for Honey Mustard Salad Dressing. The recipe is below the video demonstration. Enjoy!
I hope this helps!
Judi
Simple Honey Mustard Salad Dressing
Makes 1 to 2 Servings
2 Tbsp extra virgin olive oil
1 Tbsp honey*
1 Tbsp prepared Dijon-style mustard
1 Tbsp vinegar of choice or lemon juice
For 2 to 4 Servings:
4 Tbsp extra virgin olive oil
2 Tbsp honey*
2 Tbsp prepared Dijon-style mustard
2 Tbsp vinegar of choice or lemon juice
Measure and place all ingredients in a small bowl and whisk with a fork until blended. Or pour ingredients in a small jar with a tight-fitting lid and shake well. Store in the refrigerator.
This recipe can easily be increased according to how much you need or want to make at one time.
* Reduce the honey to half what the recipe calls for if you want a less sweet dressing.
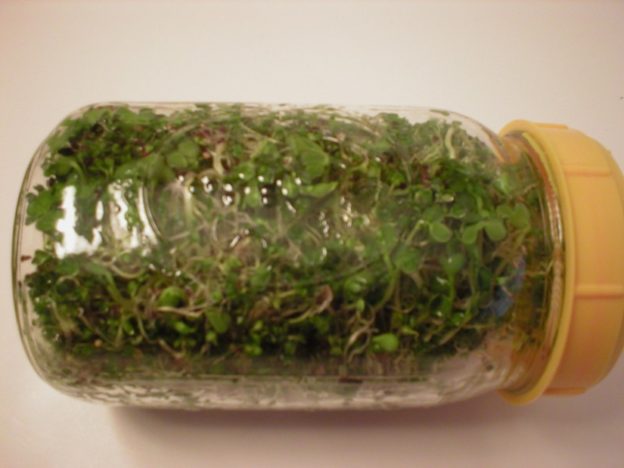
Growing jar sprouts is not hard. It’s something I’ve been doing for well over 20 years! Yet, if certain steps are not followed, you will not have a successful harvest and your sprouts may spoil along the way. That’s a waste of your time and hard-earned money. So, follow the simple steps discussed in the video below and read through the tips for successful sprouting following the video. Enjoy!
I hope this helps!
Judi
Tips for Growing Jar Sprouts
* Although any type of glass jar will work when growing sprouts, a quart-size wide-mouth mason jar is easiest when rinsing, draining and removing grown sprouts, so start with this type if you have one. Be sure your jars are well washed. Some people prefer to sanitize them in boiling water first.
* Whatever lid you use, be sure it will allow for air flow because your seeds and growing sprouts need air. If you don’t have a sprouting lid, use cheesecloth or a piece of clean nylon screen secured around the rim of the jar with a rubber band. Also, a piece of needlepoint mesh can be cut to fit inside a metal mason jar rim and used in place of a purchased sprouting lid.
* Use seeds only intended for sprouting. Although any seeds can be sprouted, seeds intended for soil planting are often treated with chemicals. This makes them undesirable for eating. Seeds designated for sprouting are not treated and are thereby safe to eat.
* Seeds will last the longest with the best germination rate when kept in a cold environment. Store seeds in your freezer for the longest life.
* When sprouting small seeds such as broccoli or alfalfa seeds, use 1 to 2 tablespoons of seeds. More will overcrowd the jar, not allowing them to grow to their fullest potential.
* When sprouting large seeds, such as lentils or mung beans, you could grow ¼ cup to ½ cup of seeds at a time in a quart-size mason jar.
* Rinse seeds well at the start of the sprouting process to remove any dust, debris and/or pathogens. Then cover them with cool filtered water and allow them to soak in a cool location according to the directions on the seed package (different types of seeds need different soaking times).
* Rinse and drain your growing sprouts twice a day with cool water at roughly 12-hour intervals. (Some growers prefer to rinse/drain sprouts 3 or 4 times per day. See the recommendations that came with your seeds.) Seeds may grow better being rinsed 3 or 4 times a day when in a warmer climate, especially in the early stages of growth.
* Prop your sprouting jar at a 45-degree angle to allow water to completely drain out before laying the jar on its side. Laying it on its side allows air to flow in and out of the holes in the lid while also exposing your sprouts to as much light as possible.
* For optimal growth, after your seeds/sprouts are rinsed and drained, place the jar in a sunny or well-lit location that is cool, not warm.
* Sometimes during the growing process you may notice white fuzzy areas in your sprouts. It looks like mold, but more likely is simply root hairs reaching out for water. If this happens, your sprouts are thirsty. If you rinse and drain them, the fuzzy root hairs should disappear.
* Different types of seeds may take different timeframes to grow, usually ranging from 2 days to about a week. See your seed package to know about how long you should allow your seeds to sprout.
* If your sprouts develop a foul odor or peculiar, wilted appearance, do not eat them. They need to be discarded and the jar and lid should be sanitized before starting over.
* Don’t water your grown sprouts right before storing them in the refrigerator. The excess water may cause them to spoil. Although it is not mandatory, some people prefer to remove ungerminated seeds before storing the sprouts. To do this, place all the jar contents (your grown sprouts) in a large bowl of water. Swish them around and the ungerminated seeds will float to the top. Scoop them off and discard them. Drain the sprouts very well to be sure there is no excess water left in them, as it will cause them to spoil. Store them in the refrigerator in a container with a lid. Line the container first with a cloth or paper towel to soak up any extra water. To help avoid the possibility of excess water in your storage container, you could simply rinse sprouts in a bowl of water, removing the ungerminated seeds, as you need them for your salads or snacks.
* Put a paper towel or napkin in the bottom of your storage container for your finished sprouts. That will soak up any extra water yet help to maintain a humid environment, which will keep the sprouts from drying out. Store them in a container with a lid, in the refrigerator. They should be used within a few days.
* If you want to remove unsprouted seeds from your finished sprouts, here’s a way to do it…
About Judi
Julia W. Klee (Judi) began her journey enjoying “all things food” in elementary school when she started preparing meals for her family. That love of food blossomed into a quest to learn more and more about health and wellness as related to nutrition. She went on to earn a BS Degree in Food and Nutrition, then an MS Degree in Nutrition. She has taught nutrition and related courses at the college level to pre-nursing and exercise science students. Her hunger to learn didn’t stop upon graduation from college. She continues to research on a regular basis about nutrition as it relates to health. Her hope is to help as many people as possible to enjoy foods that promote health and wellness.
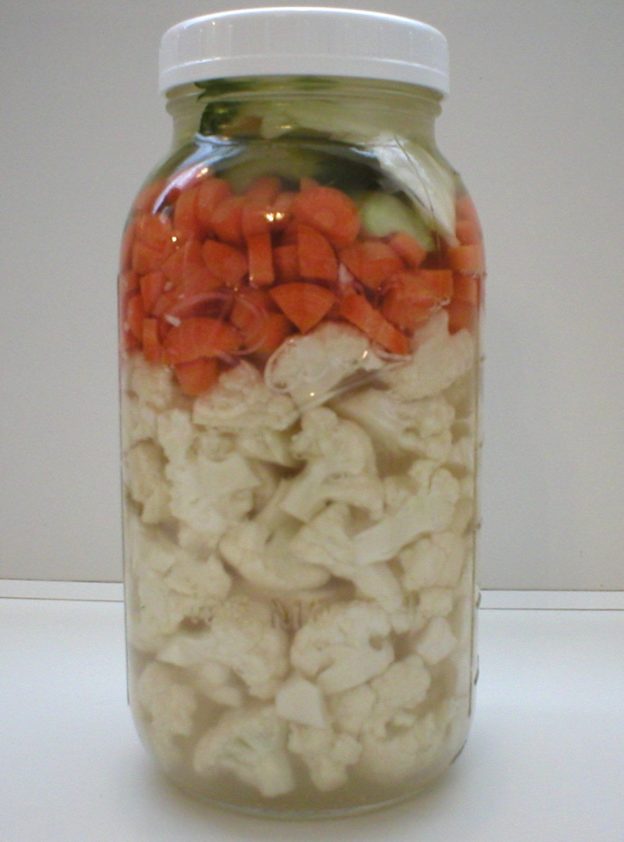
I’ve been enjoying fermented vegetables with my salads and other meals for quite some time. After trying a series of fermentation methods, some with success and some without, I’ve settled on this really simple way to ferment vegetables. For me, it’s been a no-fail method with success literally 100 percent of the time. In the video below I detail how I ferment cauliflower. This same method could be used to ferment just about any fresh vegetable you want. Enjoy!
I hope this helps,
Judi
About Judi
Julia W. Klee (Judi) began her journey enjoying “all things food” in elementary school when she started preparing meals for her family. That love of food blossomed into a quest to learn more and more about health and wellness as related to nutrition. She went on to earn a BS Degree in Food and Nutrition, then an MS Degree in Nutrition. She has taught nutrition and related courses at the college level to pre-nursing and exercise science students. Her hunger to learn didn’t stop upon graduation from college. She continues to research on a regular basis about nutrition as it relates to health. Her hope is to help as many people as possible to enjoy foods that promote health and wellness.
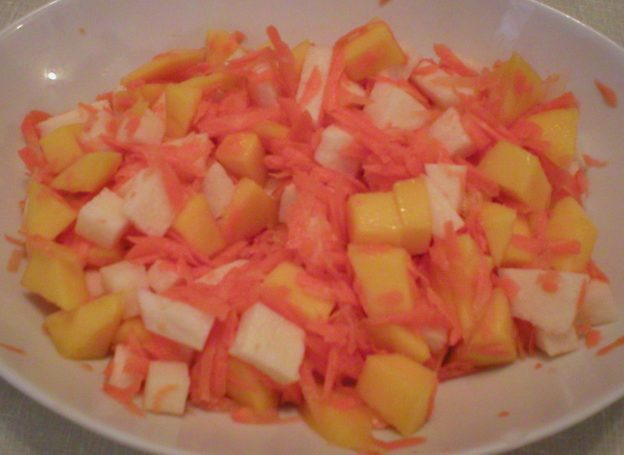
Wondering what to do with jicama? It’s delicious raw served in salads. Hence, I put together the following refreshing and SIMPLE salad to enjoy anytime…with a meal, as a snack, and even as a dessert if you don’t want something overly sweet. The salad blends the flavors of jicama, mango and carrots, all tied together with a sweet/sour mixture of lemon juice and maple syrup or honey. It’s delicious, colorful, refreshing, mildly crunchy, lightly sweet, and really easy to make!
Below is a video where I demonstrate how to make the salad. Below the video is the written recipe. Enjoy!
I hope this helps!
Judi
Jicama Mango Carrot Salad
Makes about 4 Servings
1 small jicama, peeled and cubed
1 ripe mango, peeled and cubed
1 cup shredded carrot
Juice of ½ lemon
2 tsp maple syrup or honey (or to taste)
Combine vegetables in a medium size bowl; stir to combine.
In a small bowl, combine the lemon juice and maple syrup or honey. Drizzle the lemon juice mixture over the jicama mixture; stir to combine.
Cover and place in the refrigerator for an hour or two before serving to allow flavors to blend. Enjoy!
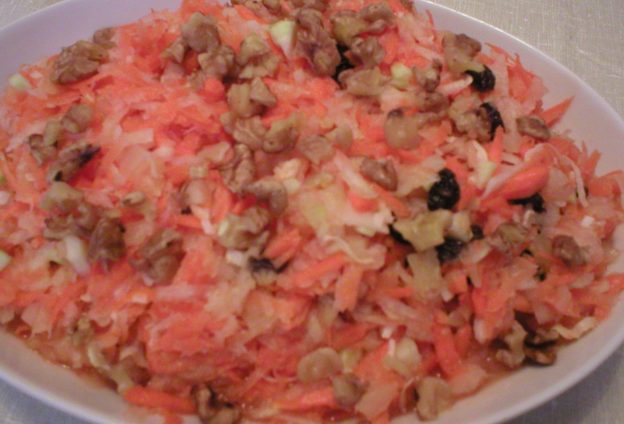
Wondering what to do with kohlrabi? Well this interesting vegetable can be used in many ways. When used raw, kohlrabi can add a nice crunch to a salad. Here’s a recipe incorporating kohlrabi into a delicious and refreshing salad with carrots and pineapple. The recipe is below the video demonstration. Give this a try sometime. It’s delicious!
Happy eating!
Judi
Kohlrabi Carrot Pineapple Salad
Makes 8-10 Servings
(Note…This recipe can EASILY be cut in half if less amount is preferred)
1 raw kohlrabi, washed, peeled and grated
2 large carrots, peeled and shredded
1/3 cup raisins
1/4 cup unsweetened coconut flakes
1 (8 oz) can crushed pineapple, packed in 100% pineapple juice*
Up to 1 Tbsp maple syrup or honey, optional
1 tsp lemon or lime juice, optional
Optional garnishes:
Toasted walnuts, coarsely chopped
or Unsweetened coconut flakes
or Toasted Pecans, coarsely chopped
Wash, peel and grate the kohlrabi into a large bowl. Peel and shred the carrots and add to the bowl with the kohlrabi. Add the raisins, coconut, and crushed pineapple (see note below about the amount of pineapple to use). Stir to combine all ingredients.
Place in a covered container and refrigerator for 1 to 2 hours to allow flavors to blend. Taste the mixture. If more sweetness is needed, add the optional ingredients, if desired. OR add more pineapple.
* If you want more pineapple flavor, you can use one larger (20 oz) can of pineapple packed in unsweetened pineapple juice in place of the 8 oz can. OR you can add any amount in between the two can sizes, to your desired flavoring.
This makes a lot of salad. If a smaller amount is needed, simply use half the amount of ingredients.
Here’s a simple recipe for a salad dressing I make for my husband VERY often. He loves it! I keep a bag of frozen raspberries in the freezer so they are handy whenever I need them.
I usually make up one serving at a time since it takes so little effort. The key is to get the raspberries out of the freezer before even starting to assemble your salad. Place what you need in a small bowl so they can thaw while you prepare your salad. By the time your salad is ready, the raspberries should be thawed and ready to be quickly made into a dressing. A link to my video on how I make this is above and the recipe is below.
1/4 cup frozen raspberries
1/4 to 1/3 tsp salt (or to taste)
1 tsp sugar (or to taste)
1 Tbsp red wine vinegar
2 Tbsp extra virgin olive oil
Place the frozen raspberries in a small bowl. Top with salt and sugar. Set the bowl aside to allow raspberries to thaw as you assemble your salad. When your salad is ready, finish making the dressing. The raspberries should be thawed by this time. Mash them up and stir in the salt and sugar with the spoon. Add the vinegar and oil; stir then drizzle over salad. Toss to combine. Enjoy!
Raspberry Vinaigrette Salad Dressing
(Makes Four Servings)
1 cup frozen raspberries
1 tsp salt, or to taste
4 tsp sugar, or to taste
1/4 cup red wine vinegar
1/2 cup extra virgin olive oil
Place the raspberries, salt and sugar in a container with a lid. Set it aside until the raspberries thaw. After the berries are thawed, mash the berries while mixing in the sugar and salt with a spoon. Add the vinegar and oil, cover the container, and shake until mixed. The oil will have a tendency to rise to the top…this is normal. Store in a covered container in the refrigerator. Use within a few days.
Many people are making fresh fruit and vegetable juice these days. And the trend is growing in popularity for good reason. It’s a GREAT way to add vital nutrients to your diet by increasing your consumption of those highly valued vegetables and fruit. But all that juicing leaves one with the question…What do I do with all this extracted pulp??
There are many websites, blog posts, and YouTube videos online showing the usual uses for the pulp: adding it to the compost pile, or make pulp crackers or vegetable broth. Those are all great ing suggestions and well worth trying. But I came up with yet another way to use the pulp that I haven’t seen before. Why not dehydrate it and use it for salad sprinkles?
Using the pulp for a salad sprinkle will not only add a little crunch to your salad and the flavored essence of the juiced vegetable or fruit, but it also adds the highly prized and much needed fiber that so many Western diets are lacking!
The pulp can be dehydrated and used just as it is…plain. OR, you could add any variety of herbs and spices that you want to flavor it your way according to your own liking. The flavoring options are limited only to your imagination.
Storing your salad sprinkles is simple. Just place them in an air-tight container and keep it somewhere where you won’t forget about it when it’s time to make a salad. Yes, placing an oxygen absorber in the container would also help to keep your sprinkles fresh, but if they’re used regularly, you’ll go through them quickly, so long-term storage probably won’t happen. Vacuum-sealing the container seems to be a waste of time and effort if you’ll be using the sprinkles regularly, so that shouldn’t be a concern. So, store them as you would homemade croutons and you should be good!
I created a video on making and storing dehydrated pulp to be used as salad sprinkles. Click the link below to view the video. Enjoy!
We love salads…BIG salads. Whole meal salads are what I’m referring to here. These are complete meals in a bowl and not just with a little lettuce, tomato and cheese. These salads are filled with assorted vegetables, protein sources, and fruit. What’s even better is the fact that they are totally flexible in what is put in them, so they can be tailored to individual likes and dislikes as well as what’s available at the moment. These salads are better (to us) than any salad we can get in a restaurant because they’re made the way WE like them, with ingredients WE prefer! You too can build a better salad, YOUR way. The following are the basics of how I build a better salad…
Start with a lettuce bed of mixed greens. Use a mixture of assorted greens as the foundation of your salad. Use whatever you can get and mix them up…iceberg, Romaine, green and/or red leaf lettuces, arugula, baby kale, spring mix, spinach, red or green cabbage, etc. Get creative!
Add a big assortment of fresh veggies. Again, get creative. Use what you have available to you and don’t be afraid to try something new. Suggestions include: cucumber, tomatoes, yellow squash, zucchini squash, celery, red, green, and/or yellow bell pepper, fresh broccoli and/or cauliflower, lightly steamed (and cooled) asparagus, jicama, red or yellow onion, scallions, chives, minced garlic, lightly steamed (and cooled) green beans, roasted (and cooled) Brussels sprouts… Explore the produce isle of your favorite grocery store and let your imagine run wild!
Add a protein source (or two…or three). I always add thawed frozen green peas to our salads. They make a nice addition to any green salad and are packed full of protein. They’re for starters. From there, I add garbanzo beans (to my salad), diced cheese, assorted nuts of choice, and sometimes sliced hard boiled egg. If you’re a fan of meats in your salads, thinly sliced grilled steak or chicken breast would be a flavorful addition. Grilled salmon would be a prized addition, too. Whether you add meat or not, there are plenty of options to choose from so that your salad will provide enough protein to meet anyone’s needs.
Build a Better Salad
Add fruit for color, sweetness and eye candy. We started adding fruit to our meal salads after my husband returned from a trip to Hawaii with his college jazz band. He found that restaurants there added fruit to their salads and he really enjoyed it. Thanks Hawaii! Good fruits to include are fresh or canned pineapple, chopped fresh apple, blueberries, strawberries, tangerine (Clementine) sections, grapes (seedless would be preferred). Even diced pear would make a good addition! Try fresh raspberries for added sweet/tang!
Dress your salad…but don’t overdo it. Dressings are added to salads for flavor, moisture and binding properties. The problem with dressings is that many people simply add too much. This can make salads unhealthful to eat. The veggies and fruit are not the culprits. It’s the dressing. The above salad suggestions would go well with just about any dressing you choose. Just strive to go light on the dressing and still enjoy the wonderful flavors of the vegetables, fruits, and protein foods you used to construct your meal. If you can’t taste the other components, then you have too much dressing. Make it your goal to avoid using too much dressing. This will keep your salads healthful and calorie-controlled.
We usually use oil and vinegar as our salad dressing. The ratio will vary according to individual tastes, but a general rule of thumb is 2 parts oil to 1 part vinegar. A lot of flavor variation can be obtained by using different vinegars at different times: red wine, apple cider, tarragon, raspberry, and rice vinegars all lend different flavors to a salad, so experiment. Added herbs can also bring a new flavor to your salad. Suggestions include: oregano, dill, parsley, and tarragon (used individually, not all in the same salad). Get creative!
Here’s a video showing the construction of the salads in the featured photo. Enjoy! Judi