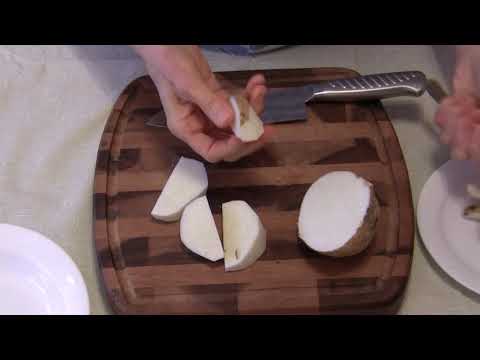
Jicama is a mildly sweet vegetable with a crunch like an almost ripe pear. It’s delicious raw in salads and added to stir-fry combos. If you haven’t tried it, let me urge you to give it a go! In the video below, I have some valuable tips on how I cut and store jicama.
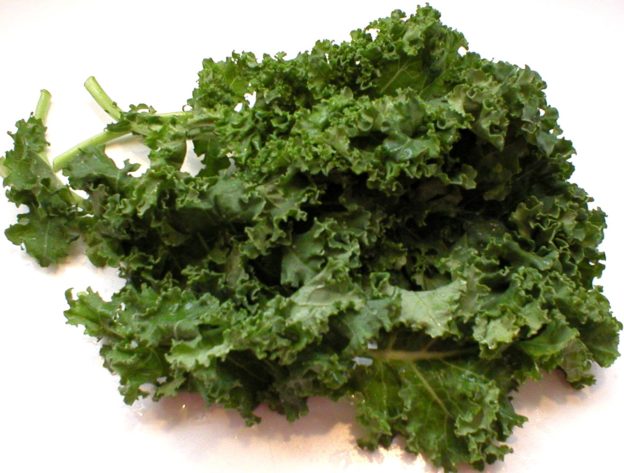
Kale, a richly colored leafy green vegetable, is truly a powerhouse of healthful compounds for the body. In recent times, people have discovered this king of veggies and found some very creative ways to prepare it, making it very enjoyable to eat, even for those who hate their vegetables.
Below is a video I created about kale. My video notes are below. Enjoy!
I hope this helps!
Judi
Kale 101 – The Basics
About Kale
Like other vegetables I’ve covered so far, kale is a member of the cabbage family, being a cousin to cabbage, cauliflower, collards, broccoli, Brussels sprouts, and more. Like some other members of this plant family, kale is often referred to as a “super food.” Kale comes in different varieties with curly, or flat leaves, and colors ranging from deep green and blue-green to purple. Some common varieties of kale include Curly Kale (Scots Kale), Dinosaur Kale, Ornamental Kale, Red Russian Kale, and Siberian Kale. Their leaf styles and colors will vary, and their flavors will also be slightly different.
Nutrition Tidbits
Kale is an absolute powerhouse of nutrients and is often referred to as one of the healthiest foods to eat. PERIOD! One cup of raw kale has only 33 calories, 2.5 grams of fiber, vitamins A, C, and K, folate (a B vitamin), a little omega-3 fatty acids (alpha-linolenic acid), and important minerals including phosphorus, potassium, calcium and zinc. Kale also contains lutein and zeaxanthin, nutrients that protect our eyes against macular degeneration and cataracts. The anti-cancer and anti-inflammatory effects of kale are well-established in scientific literature.
How to Select Kale
Look for dark, crisp, unwilted leaves. Those with yellowing or brown leaves are older, so try to avoid them if you can. The smaller leaf plants will be more tender than those with larger leafs.
How to Store Kale
Kale should be refrigerated. To help extend the life of fresh kale, wrap the bundle in a cloth kitchen towel (or paper towels) and place it in a plastic bag (even a grocery plastic bag will do) and store it in the refrigerator. As with any fresh vegetable, it should be used as soon as possible, but may keep for a week when wrapped in a towel within a plastic bag. Do not wash your kale until you are ready to use it. If it has gotten a little limp in the refrigerator, place the kale in a large bowl or pot of cold water for about 10 minutes. Then wash and use it as desired.
If your stored kale has become soft, discolored or mushy, remove and discard that part before use.
Is kale eaten raw or cooked?
Kale can be eaten raw or cooked. It is also used in raw vegetable juice blends.
How to Prepare Kale Raw kale can be added to salads, smoothies, and added to vegetable juices. The smaller leaf varieties may be more enjoyable when eaten raw since those leaves are more tender than the larger ones.
Kale can be cooked in a variety of ways: sautéed, baked into chips, steamed, added to soups, chowders and stews, and added to any number of hot dishes along with other vegetables, grains, and sauces.
Steam kale for 5 minutes then add flavorings as desired.
Kale With Other Vegetables: Here a simple recipe for Easy Kale, Carrot, and Mushroom Combo https://youtu.be/kbLtLD1RSug
Kale Soup: Here’s a video where I made a really delicious soup with kale, potatoes, carrots and leeks… https://youtu.be/4G9422NnYuc
See below for more kale recipe links.
Fresh vs Frozen
Frozen kale is often found in grocery stores.
You can freeze kale yourself by washing, then cutting it into small pieces. Blanch the kale leaves in boiling water for 2-1/2 minutes, and stems for 3 minutes. Drain and immediately place them in a bowl of ice water for about 3 minutes. Drain well and place in freezer containers or bags, then freeze. The kale will keep for 8 to 12 months.
Some people will freeze cut kale leaves without blanching or steaming first. Kale frozen this way will only keep for 4 to 6 weeks and should be used within that time frame. Kale frozen this way can be steamed and stir-fried.
Herbs/spices that go well with kale
Basil, bay leaf, coriander, garlic, ginger, red pepper flakes, lemon, marjoram, onions, oregano, nutmeg, and rosemary
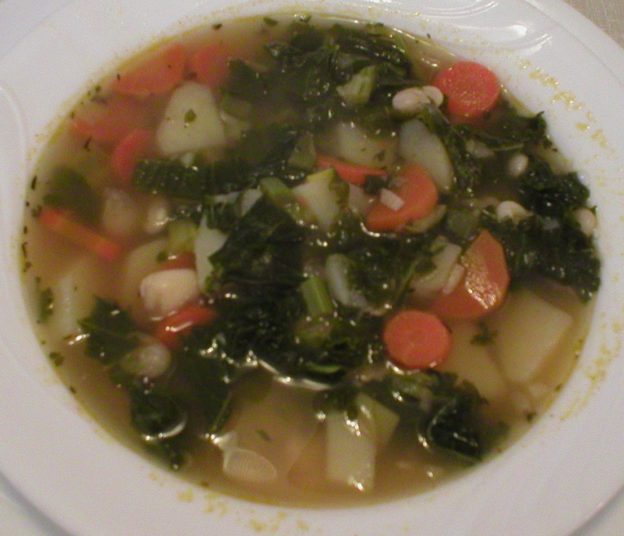
Here’s an easy soup that’s simple, fast and delicious! It is light yet will warm your soul on a cold winter day. It’s made with the super-veggie kale, along with potatoes, carrots, and leeks. Beans were added for protein and fiber. It’s simple and well worth trying! A video is below showing how to make the soup. The written recipe is below that. Enjoy!
I hope this helps!
Judi
Kale Soup with Potatoes, Carrots and Leeks
Makes About 10 Cups
1 Tbsp extra virgin olive oil
1-1/2 cups sliced leeks (or 1 cup diced yellow onion)
2 large cloves garlic, finely chopped
1-1/2 cups sliced carrots
Sliced kale stems (removed from leaves for the soup)
1-1/2 cups diced white potatoes
4 cups chopped kale leaves
1 (15 oz) can great northern beans, rinsed and drained (or 1-3/4 cups cooked beans)
4 cups vegetable broth (or chicken broth, if preferred)
2 cups water
2 tsp dried parsley
1 tsp dried thyme, optional
Salt and black pepper to taste
Heat the olive oil in a large pot with a lid, over medium heat. Add the leeks (or onions), garlic, carrots, and sliced kale stems. Sauté the vegetables for 3 or 4 minutes, until they are aromatic and starting to soften.
Add the potatoes, kale leaves, beans, broth, water, parsley and thyme. Stir to combine. Bring the soup to a boil, cover with lid, and lower heat to simmer. After the soup has cooked about 10 minutes, taste for seasonings and add salt and pepper to taste. Allow soup to simmer, up to 30 minutes, to allow vegetables to soften and flavors to blend. Enjoy!
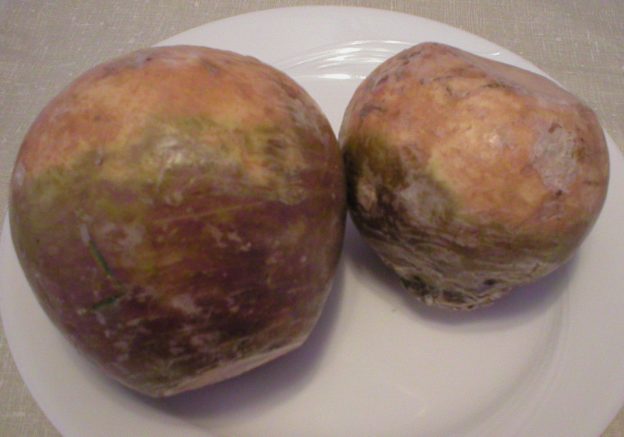
The humble jicama is one vegetable many people are not sure what to do with. It looks like a weird potato, yet is so very different and can be used in different ways than a potato. Whether it’s served raw or added to stir-fry combos, jicama is one vegetable to try.
It’s crunchy and mildly sweet and adds an interesting note to any dish it’s used in. I enjoy them raw and plain for a simple snack. They’re THAT good to me! I urge you to get brave and give them a try!
Below is a video where I talk about the basics of jicama…what they are, nutrition tidbits, how to use them, store them, prepare them, etc. I also have suggested recipes and links with interesting recipes included. Below the video are my discussion notes. Enjoy!
I hope this helps!
Judi
Jicama 101 – The Basics
About Jicama
Jicama is a root vegetable native to Mexico, Central and South America. It is often called a Mexican yam bean, Mexican turnip, or Mexican potato. The plant is so popular that it is now found all over the world. It has the appearance and texture similar to a potato, but the flesh is firm like a pear. The taste is mildly sweet with a slight apple flavor.
Nutrition tidbits
Jicama is low in calories (1 cup has 49 calories) but high in the soluble fiber inulin, which is important for our gut bacteria, bowel regulation, and might also help to control blood sugar and triglyceride levels.
Jicama also contains a lot of vitamin C, some potassium, and other nutrients.
How to select jicama
Look for ones that feel firm with little bruises or scaring on the surface. Avoid any with signs of mold.
Fresh vs frozen vs canned
Fresh jicama is what is commonly available. It is not available canned (to the best of my knowledge). Jicama can be frozen, but the starches in the vegetable may change, so fresh consumption is recommended.
How to store jicama
Store jicama in a cool, dry place. DRY is key here, because moisture will cause the vegetable to develop mold.
Once it is cut, wrap DRY jicama in plastic wrap and store it in the refrigerator. Use within 3 to 5 days.
How to prepare jicama
The skin, leaves, seeds and PEEL of jicama are toxic and NOT edible. So, remember to peel your jicama before using it in any dish. Cut off and wash only what you plan to use at the moment, leaving the remaining part completely dry. Wrap the remaining part in plastic and store it in the refrigerator.
Once peeled, cut the jicama into desired size pieces that you need…cubes, slices, matchsticks, etc. The cut pieces will not turn brown after cutting.
Cooking/serving methods
RAW: Jicama is delicious when used raw in salads and slaws. The faint apple flavor allows it to go well with assorted salad vegetables like carrots and onions, and fruits like oranges and apples. A favorite way to serve jicama in Mexico is to sprinkle chilled slices with chili powder, salt and lemon or lime juice.
Try adding jicama to your favorite fruit salad…the crunch and mild sweetness will only enhance the appeal of the salad!
Try making a jicama salsa by combining diced jicama, corn, tomatoes, black beans, red onion, jalapeno, lime juice and onion. Sounds yummy!
COOKED: Jicama goes well in stir-fries, offering the crunch of water chestnuts but with a mild sweetness. Jicama goes well with meats and seafood. Jicama can also be cooked on the grill or added to soups.
Jicama can be roasted! Place cubes on a baking pan. Preheat the oven to 400F. Sprinkle the jicama with olive oil, rosemary, parsley, and a little minced garlic; toss to coat the jicama pieces. Roast it for about one hour.
How to preserve jicama
Jicama must be kept dry to prevent the formation of mold. Once it is cut, wrap it tightly in plastic and store it in the refrigerator. Use as soon as possible, within 3 to 5 days.
Herbs/spices/flavorings that go well with jicama
Cilantro, onions, chili powder/peppers, lemon, lime, orange
Foods that go well with jicama
Lime, lemon, orange, assorted fruits, avocado, bell peppers, mangoes, cucumbers, carrots, jalapenos, black beans
Are you wondering what to do with Spring Mix? I did research on your behalf and found that it can be used in ways beyond salads! See my video below where I discuss my findings. My notes are below the video. Enjoy!
I hope this helps!
Judi
Spring Mix 101 – The Basics
About Spring Mix
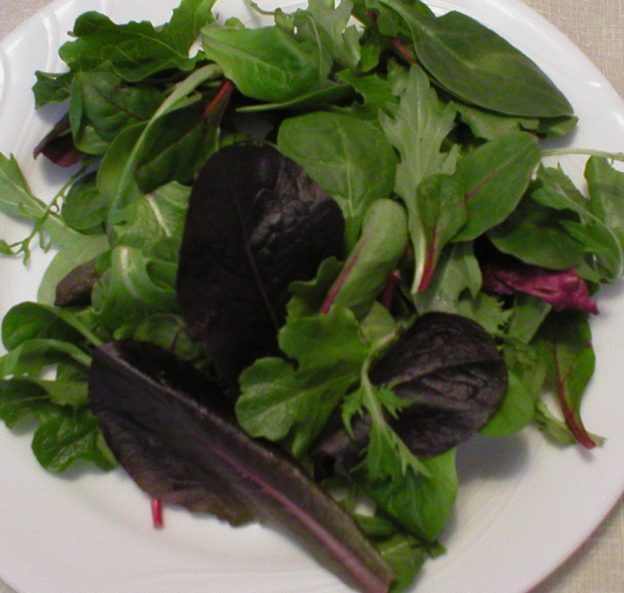
Spring mix contains a variety of fresh greens with different tastes and textures, including red romaine, baby spinach, radicchio, green romaine, red oak leaf, mizuna, red leaf, lollo rosso, arugula, red mustard, green mustard, red chard, frisee, and tatsoi. It contains a mixture of sweet and mild, and also slightly bitter flavors. The variety may vary among different brands.
Nutrition Tidbits
Greens contain vitamins A, C, E, and K, folate, calcium, and potassium. It is very low in calories.
How to Select and Store Spring Mix
Choose greens that look fresh and dry. Store them in the refrigerator and use them before the “Use By” date because they don’t last as long as mature greens. Spring mix greens purchased in plastic tubs tend to last longer than those sold in bags because the tubs help protect them from getting damaged. Spring mix greens are so tender that they are best eaten fresh (rather than preserved via freezing, etc.).
Serving Ideas
Spring mix can be used as a bed of salad greens or mixed with other greens for a delicious salad. When using only spring mix in a leafy salad, use lightweight dressings and ingredients, as the tender greens don’t hold up well with heavy ingredients. Basil, lemon, garlic, onion, parsley, chives, balsamic vinegar, tomatoes, fruit, toasted nuts and bacon all go well with spring mix.
Spring mix can also be used as a bed for fresh or grilled fruits and other vegetables.
Toss spring mix with a balsamic vinaigrette and top with fresh sliced strawberries, walnuts, and an ounce of goat cheese.
Toss greens, walnuts, and cranberries in a sweet balsamic dressing. Top with goat cheese.
Add mixed greens, Kalamata olives, feta, pepperoncini, and cucumber in a bowl. Add olive oil and lemon. Toss gently. Salt and pepper to taste.
Take your favorite homemade or premixed grain salad and toss in a handful of baby greens.
Add candied or roasted pecans to your mixed greens and toss in a bowl with feta or goat cheese. Top with fresh raspberries.
Use extra spring mix to make a green smoothie. Blend a couple handfuls with a banana and some other fruit or favored flavorings and enjoy!
Spring mix can also be lightly sautéed in a little fat of your choice along with garlic, sesame seeds, and other flavorings. Top it off with a little rice vinegar, soy sauce, or lemon juice to brighten the flavor.
Spring mix can also be used as a substitute for spinach in any dish, cooked or raw.
Try also quickly steaming spring mix with no special equipment. I show how to steam spinach that way in the following video, but using spring mix instead of fresh spinach would work just as well. Judi in the Kitchen video, FAST and EASY Steamed Spinach … https://youtu.be/ZWuZHxdPGxg
Wondering what to do with an extra rutabaga that’s begging to be eaten? Try this easy recipe for Honey Glazed Rutabaga. It’s all done in one pan in two simple steps: boiling the rutabaga first, then glazing it. It’s simple and delicious and the flavorings can be adjusted based on your preferences. The recipe is below. Enjoy!
I hope this helps!
Judi
Honey Glazed Rutabaga
Makes 4 Servings
1 medium to large rutabaga
2 Tbsp butter, or to taste (more if the rutabaga is very large)
2 Tbsp honey, or to taste (more if the rutabaga is very large)
Salt
Pinch of ground ginger, optional
Peel and cut the rutabaga into small cubes. Boil the rutabaga in salted water for 15 minutes, or until fork tender. Drain and return the cooked cubes to the same pan. Add butter, honey, a pinch of salt, and a pinch of ground ginger (if desired), and stir the mixture to coat the rutabaga. Place the pan over medium heat and continue stirring/tossing the rutabaga until any remaining water is evaporated, the glaze turns clear, and the rutabaga cubes begin to brown, about 5 to 7 minutes, depending on the size of your pan. Serve and enjoy!
Tip: Preparing this in a skillet will help in the glazing step, allowing more of the rutabaga to glaze/brown at the same time, versus doing it in a saucepan.
If you’ve ever dealt with fresh leeks, you KNOW that washing them well is extremely important. There’s a LOT of dirt packed between those leaves! In the video below, I show a simple way to wash the leeks and prepare them for the freezer. No blanching needed!
Below the video are details about different ways to wash leeks. The choice is yours on which method to use. Also, simple instructions on how to freeze leeks follow the washing instructions.
I hope this helps!
Judi
Ways to Wash Leeks
Leeks grow partly underground, so dirt or sand is likely to be between the layers of their leaves. Wash them thoroughly before cooking. Several methods can be used:
1. Trim off the roots and the tough, dark green tops of the leaves. If the outer layer is wilted or discolored, peel it away and discard. Slice the leek completely in half lengthwise. Separate the leaves and rinse them well under running water. The leeks can then be sliced into desired size pieces.
2. Quarter or halve the leek lengthwise, leaving the root end intact by cutting lengthwise from about one inch up from the root end. Fan the stalks outward and rinse them under running water while rubbing the leaves with your fingers to remove dirt. This works well if using the leek whole in a recipe.
3. If you need sliced leeks, slice them crosswise and wash the pieces well in a bowl of water or in a colander under running water. Repeat this process until you see that all dirt has been removed.
However you choose to wash the leeks, just be sure you wash them thoroughly because there’s sure to be dirt between the layers!
How to Freeze Leeks
Wash the leeks very well to remove all traces of dirt and grit from between the leaves.
Cut the leaves into the size pieces you anticipate needing when they are used in cooking.
Place the cut leeks into freezer bags. Be sure to label the bags with the contents and date. They will keep well in the freezer for 5 to 6 months.
Flatten the contents of the bags as much as possible and lay them flat in the freezer. When they are frozen, you could lightly drop the bags on the kitchen counter or table to loosen the contents so they are easier to get out of the bag when needed.
Alternatively, you could place the cut leeks on a baking sheet lined with parchment paper. Place the baking sheet in the freezer. When the leeks are frozen, transfer them to a labeled freezer bag and store for up to 5 or 6 months.
Leeks are found in most grocery stores, yet some of us just don’t quite know what to do with them. I recently released a video (by viewer request!) on the basics of leeks. The video scans topics such as what they are, what they taste like, nutritional aspects, how to choose, store, preserve, and use them, as well as offering some links to interesting recipes. Below is a link to my video covering this topic. Enjoy!
Below the video is a copy of my notes used in the video discussion for your reference. Please do let me know if you need further information about leeks and I’ll be happy to provide the info if I can!
Hope all this helps!
Judi
Leeks 101 – The Basics
About Leeks
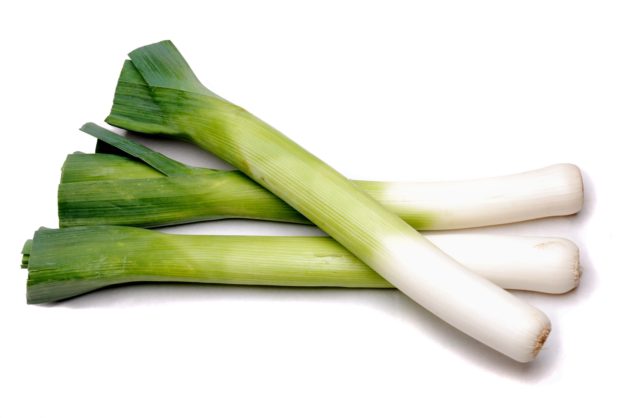
Leeks are in the same plant family as onions, scallions, garlic, shallots, and chives. They look like giant scallions (or spring onions). They have the mildest flavor of their plant family. They bring a hint of garlic and onion to dishes they’re used in. They can be eaten raw in salads or cooked.
Nutrition tidbits
With leeks being members of the allium family (like onions and garlic), they have health-promoting properties that benefit cardiovascular health, help fight cancer and other diseases prevalent in this world today.
They contain good amounts of vitamin K, manganese, copper, vitamin B6, vitamin C, folate, iron and more.
How to select
Smaller leeks will be more tender than the larger ones. Look for dark green leaves that are crisp and free of blemishes. Avoid ones with dried roots as they are older and not as fresh.
How is it usually eaten…raw or cooked?
Leeks are used in any dish where a mild onion flavor is desired. This usually involves cooking, but they can also be eaten raw anytime a mild onion flavor is preferred.
Fresh vs frozen vs canned
Leeks are commonly found fresh in grocery stores. They do not come canned and it’s unlikely to find them frozen. However, you can freeze them yourself to preserve them for later use.
To freeze fresh leeks: Wash them thoroughly to remove any grit between the layers and allow them to air dry as much as possible to remove water. Remove the outer tough layers, cut off the root end and chop the leeks into desired size pieces. Place them in a labeled freezer bag and store in the freezer. They should keep well for 5 to 6 months.
How to prepare
Leeks grow partly underground, so dirt or sand is likely to be between the layers of their leaves. Wash them thoroughly before cooking. Several methods can be used:
1. Trim off the roots and the tough, dark green tops of the leaves. If the outer layer is wilted or discolored, peel it away and discard. Slice the leek completely in half lengthwise. Separate the leaves and rinse them well under running water. The leeks can then be sliced into desired size pieces.
2. Quarter or halve the leek lengthwise, leaving the root end intact by cutting from about one inch up from the root end. Fan the stalks outward and rinse them under running water while rubbing the leaves with your fingers to remove dirt. This works well if using the leek whole in a recipe.
3. If you need sliced leeks, slice them crosswise and wash the pieces well in a bowl of water or in a colander under running water. Repeat this process until you see that all dirt has been removed.
However you choose to wash the leeks, just be sure you wash them thoroughly because there’s sure to be dirt between the layers! Cooking/serving methods
RAW:
Add finely chopped leeks to salads.
Cooking possibilities:
Sauté leeks and fennel. Garnish with fresh lemon juice and thyme.
Make vichyssoise, a cold soup made from puréed cooked leeks and potatoes.
Add leeks to broth and stews for extra flavoring.
Braised leeks sprinkled with fennel or mustard seeds make a wonderful side dish for fish, poultry or steak.
Add sliced leeks to your favorite omelet or frittata recipe.
Leeks can be fried, braised, boiled in soups or stocks, roasted in an oven, and even caramelized like onions. When cooking, try not to overcook them, as that will make them mushy. Cook them until fork crisp/tender.
How to preserve it
Leeks will keep in a plastic bag in the refrigerator for up to 5 days.
For longer storage time, they may be frozen. Leeks do not need to be blanched when freezing. Simply wash well, chop, then place in labeled freezer bags.
Herbs/spices that go well with leeks
Leeks can be used in place of onions in any dish, imparting a mild onion flavor. Complimentary herbs include parsley, sage, thyme, basil, lemon and mustard.
Other foods that go well with
Leeks partner well with ham, chicken, cheese, cream, garlic and shallots.
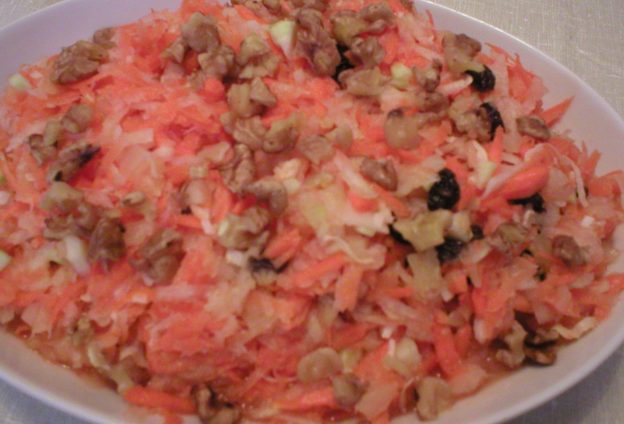
Wondering what to do with kohlrabi? Well this interesting vegetable can be used in many ways. When used raw, kohlrabi can add a nice crunch to a salad. Here’s a recipe incorporating kohlrabi into a delicious and refreshing salad with carrots and pineapple. The recipe is below the video demonstration. Give this a try sometime. It’s delicious!
Happy eating!
Judi
Kohlrabi Carrot Pineapple Salad
Makes 8-10 Servings
(Note…This recipe can EASILY be cut in half if less amount is preferred)
1 raw kohlrabi, washed, peeled and grated
2 large carrots, peeled and shredded
1/3 cup raisins
1/4 cup unsweetened coconut flakes
1 (8 oz) can crushed pineapple, packed in 100% pineapple juice*
Up to 1 Tbsp maple syrup or honey, optional
1 tsp lemon or lime juice, optional
Optional garnishes:
Toasted walnuts, coarsely chopped
or Unsweetened coconut flakes
or Toasted Pecans, coarsely chopped
Wash, peel and grate the kohlrabi into a large bowl. Peel and shred the carrots and add to the bowl with the kohlrabi. Add the raisins, coconut, and crushed pineapple (see note below about the amount of pineapple to use). Stir to combine all ingredients.
Place in a covered container and refrigerator for 1 to 2 hours to allow flavors to blend. Taste the mixture. If more sweetness is needed, add the optional ingredients, if desired. OR add more pineapple.
* If you want more pineapple flavor, you can use one larger (20 oz) can of pineapple packed in unsweetened pineapple juice in place of the 8 oz can. OR you can add any amount in between the two can sizes, to your desired flavoring.
This makes a lot of salad. If a smaller amount is needed, simply use half the amount of ingredients.
Kohlrabi is one of those vegetables that many of us don’t know what to do with. Most of us didn’t grow up eating it, so it’s really foreign to us. I’m in that same group. I had a request from a viewer to explore kohlrabi, so I have!
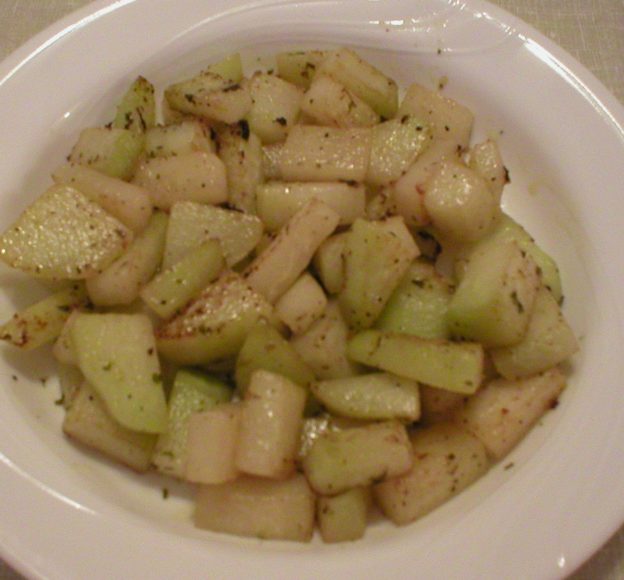
Here’s one way I found to cook the bulb of kohlrabi. This simple recipe for sauteed kohlrabi is really easy and quick to make, and involves ingredients that you likely have on hand. Below is a video demonstration of the recipe with the written recipe below that. Enjoy!
I hope this helps!
Judi
Easy Sautéed Kohlrabi
Makes About 3 Servings
1 raw kohlrabi bulb
1 Tbsp extra virgin olive oil*
Garlic powder to taste (or 1 clove garlic, finely chopped)
Salt and pepper to taste
About 1 tsp dried cilantro or parsley, or to taste
Water as needed (1 or 2 tablespoons at a time)
Juice of ½ lemon or lime
More cilantro or parsley, optional garnish
Remove the stems and leaves from the kohlrabi. Wash the bulb very well. Remove the peel and cut the kohlrabi into large cubes or bite-size pieces.
Heat a skillet over just above medium heat. Add the olive oil (or water if preferred) and allow it to heat up briefly. If using fresh garlic, add the chopped garlic and allow it to heat through briefly. Add the chopped kohlrabi. Sprinkle with garlic powder (if using it), salt, pepper and cilantro or parsley to taste. Stir-fry the combo for a minute or so.
Add one or two tablespoons of water and place the lid on the skillet. When the steam stops and the pan is almost dry (this happens quickly), stir the vegetables around and add a little more water; replace the lid. Repeat this process until they are just barely the desired crisp-tenderness that you like. Drizzle the lemon or lime juice over the mixture. Replace the lid and allow it to finish cooking, which shouldn’t take long…a minute or so. Taste and adjust seasonings, if needed. You can garnish with more cilantro or parsley, if desired. The entire process should take 10 to 15 minutes, depending upon the size of the kohlrabi pieces and the amount of tenderness you prefer.
Note: This dish is best eaten when freshly made.
*If you prefer to use no oil, just use water instead.

 English