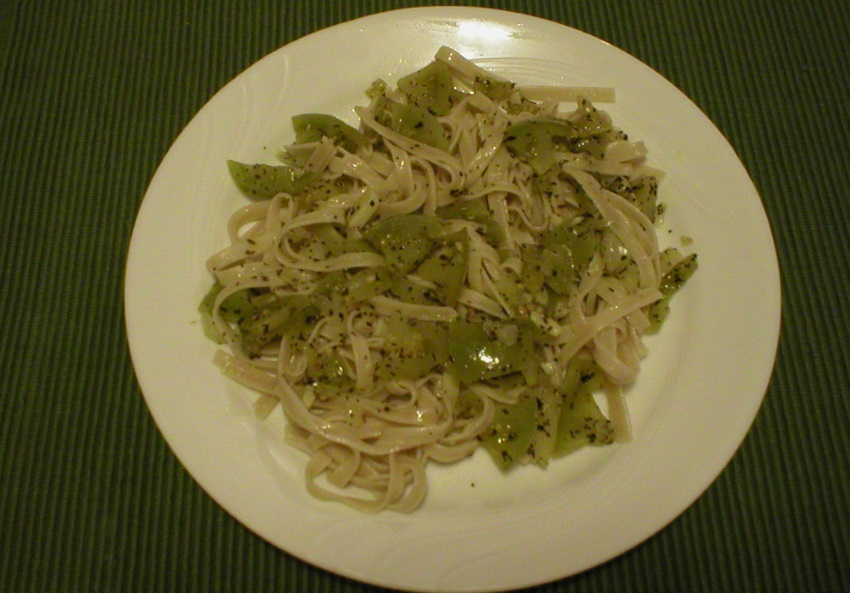
Like many people right now, I have an abundance of green tomatoes on hand from my cleaned up tomato plants. Fried green tomatoes are always good. But, I was wanting something else for a change. I always love pasta dishes, so I got creative with those green goodies. I concocted the following recipe.
It’s amazingly simple and FAST to prepare. So fast, in fact, you could start the water for the pasta as you’re cutting up the tomatoes, onions and garlic for the topping. Everything should be done about the same time. It’s THAT quick!
If you’re wanting something different to do with those green tomatoes, give this a try and let me know how it works for you! Judi
EASY Green Tomato and Herb Pasta Topping Makes 2 to 4 Servings
2 cups chopped green tomatoes
1/2 cup diced yellow onion
4 cloves garlic, minced
1-1/2 tsp dried basil leaves
2 Tbsp lemon juice
Salt to taste
1 to 1-1/2 Tbsp extra virgin olive oil
Cooked pasta of choice
Heat a skillet over medium heat. Add olive oil and allow it to heat up very briefly. Then add onion and garlic and allow them to saute for about 1 minute. Add tomatoes and remaining ingredients. Stir; place cover on skillet. Allow it to simmer 3 to 5 minutes, until tomatoes are at desired consistency. Serve immediately over cooked pasta.
Note: This topping would be excellent capped with grated Parmesan cheese.
Beets are one of those vegetables that you either love or hate. Interestingly, I’ve been in both categories in my life. When I was young, my mother would open a can of beets and boil them to have with our supper. I’m sure she just topped them with a mound of margarine and called them done. I never at them because I couldn’t get past the smell. ANY time she cooked them, I had to quickly leave the area because the smell made me gag. Really!
Hence, beets never made their way onto my taste buds until well into my adult years when I dared to try pickled beets on a salad bar. Amazingly, I loved them! That was the only way I ate beets for years.
A few times in recent years, I was given beets by friendly gardeners. With that, I began to get more daring with the little beauties. Cooked plain, they smelled and tasted like dirt to me–reminiscent of my younger years when mom cooked the canned beets. This time, I actually ate them, but can’t say I really enjoyed them.
Most recently, a neighbor shared some of her garden beets with me. I got brave and decided to experiment to make them actually taste like something wonderful that they truly are. I developed the recipe below. I made them two days in a row and they were so delicious that I ate everything I cooked! Now…If I can dare to try them, I challenge YOU to do the same. Even if beets are not your favorite vegetable, this recipe just might turn you around. A video link follows the recipe so you can see how I prepared them. Enjoy! Judi
Honey Apple Beets Makes about 2 servings
1 cup sliced peeled beets
1/2 of a fresh apple (any kind), peeled, sliced
2 slices yellow onion (about 1/4 cup)
2 tsp lemon juice
2 tsp honey
1 to 3 Tbsp water*
1 Tbsp extra virgin olive oil
1 Tbsp butter
Heat a skillet over medium heat. Add olive oil and butter. Add remaining ingredients (see note about how much water to add). Cover and allow everything to simmer/saute over medium heat for about 5 minutes, or until beets are at desired tenderness. Add more water if needed, but only in small amounts at one time. The liquids should form a delicious sauce that keeps vegetables moist as they are served.
*Note about water: If beets were frozen, allow them to partially thaw before cooking. One tablespoon of water should be enough to cook them, leaving them with still some “chew”. If you like them more soft, one more tablespoon of water and a little more cooking time may be needed.
If beets are fresh, more water will be needed to cook them to desired tenderness. Start with 2 tablespoons of water and increase from there (in one tablespoon increments) and allow them to cook to desired tenderness.
We’ve all done it…spilled or splashed something onto our clothes that might stain them. Panic hits us fast, thinking we might lose some favorite article of clothing. We reach for our arsenal of chemicals for some special stain remover we have on hand. It may or may not work.
Did you know you already have the best stain remover on hand, without buying anything special? It’s lurking by your sink. Plain ole soap. Yep, soap. I’ve had more success removing literally anything from clothing using plain soap than any other special chemical I’ve purchased.
A bar of soap is my first choice because it’s concentrated and usually (not always) has little to no coloring added to it. Liquid hand soaps will also work to remove stains, but since they often have coloring added to them, it takes a little extra effort to get the soap stain (color) out of the clothing. Also, liquid soaps have water in them (after all, they’re liquid!), so they’re not quite as concentrated as the bar soaps. Nevertheless, you can freely use what you have already have on hand. Here’s how…
As soon as possible after the stain happens, rinse the stained area with COLD water. Yes, it must be COLD. Heat will set stains, so no heat for now. Take your bar of soap and wet it, then rub it onto the stained area (or just apply liquid soap directly to the stained area). Work up a bit of a lather by rubbing the soap into the cloth with your fingers. You could also take the cloth in both hands and rub the cloth on itself. When the stain appears to be gone, rinse the soap out with cold water (still using cold here!).
If some of the stain is still there, repeat the process. If the stain seems to be stubborn, leave a little of the soap on the stained area, then put the item in the washing machine with your usual detergent and again, COLD or COOL water. Inspect the item after the washer is finished. IF you’re sure the stain has been removed, the item may be placed in the dryer. IF you’re NOT SURE the stain has been removed (sometimes you can’t tell when the fabric is wet), allow the item to air dry.
If the stain is still there, repeat the process of rubbing more soap on the stain and repeat the wash in cold water and air drying. This step is not often necessary because stains are usually removed by this time. ONLY when you’re sure the stain has been removed should the item be placed in the dryer. Why? Because heat sets stains. If there’s any stain left on the item and it’s placed in the dryer, the stain will become permanent. Good luck getting it out from there!
Check out my video (link below) to see how simple this process is. Judi
When I first discovered Larabars, I fell in love all over again. How delicious and wonderful to have such a treat, especially one that’s gluten and grain free! After eating only one bar, I decided to recreate them my way and enhance their nutritional value. (After all, I AM a nutritionist!)
So, here’s my version of a No Bake Pecan Pie Bar. As you can see in the video (link below), I make mine smaller than most people. This is to remind me that even though it’s yummy and full of good-for-you-things, it’s still a “treat” and therefore, the serving size should be limited. Hence, smaller bars, smaller pieces. I TRY (and I admit it’s hard) to limit myself to one small piece at a time, preferably as a mini dessert after a meal.
If YOU prefer larger bars and want to make a larger batch, the recipe can VERY easily be increased by any increment you want. If you opt to make a bread-size loaf pan bar, I suggest you line the pan with plastic wrap before placing your mixture into the pan to form the bar. It would be MUCH easier to remove that way. Enjoy! Judi
No Bake Pecan Pie Bars (Gluten/Grain-Free…and Yummy too!)
1/2 cup chopped dates
2 Tbsp water
1/2 c pecans
2 Tbsp almonds
2 tsp flax meal
2 tsp ground chia seeds
Pinch of salt (optional)
Place chopped dates in a small bowl. Pour 2 tablespoons of boiling water over dates and allow them to soften for about 5 minutes until most of the water has been absorbed. Alternately place chopped dates in a small microwave safe bowl. Add 2 tablespoons tap water. Microwave about 30 seconds, until water has boiled. Remove and allow dates to soften for about 5 minutes until most of the water has been absorbed. Do not drain any remaining water, nor blot the dates dry on a paper towel.
Place all ingredients in a food processor or blender. Process until ingredients are well chopped up and blended.
With a spatula, remove mixture to a large piece of waxed paper or plastic wrap. With spatula, form into a bar shape. Wrap tightly and place in refrigerator overnight to firm up and flavors to blend.
Slice into small pieces and enjoy!
Note: This recipe can easily be increased so it can be formed into a loaf pan for larger size service pieces.
So who’s not interested in saving money on expenses?? We have fixed expenses and discretionary ones. We don’t have a lot of flexibility in those fixed expenses, but we have many choices in our discretionary options, like what we buy at the grocery store. Honestly, if you look at what you spend in a month, most people spend the majority of their discretionary money at the grocery store. It really adds up, so I look for any way I can cut that back.
So, why not make reusable dryer sheets? That not only saves money on buying them over and over, but also helps reduce what goes into our landfills. All you need are two old T-shirts that are a medium-weight fabric (one light colored and one dark colored), a pair of scissors, and your favorite fabric softener. (In another write-up, I’ll share how to make your own fabric softener).
Simply cut a 6-inch square of fabric from each T-shirt. When you’re ready to use it, moisten the cloth with a little of your favorite fabric softener and toss it in the dryer with your wet clothes. Use the light colored cloth with your light laundry, and the dark colored cloth with your dark clothes. Simple! They can be reused over and over again! How easy is THAT?
Check out my video on making these cloths. Enjoy! Judi
I think anyone would (or at least should) be interested in spending less money when possible. After all…why not have a little more money in your pocket just in case…? I stumbled on a way to make homemade laundry detergent, tried it, and was impressed. Very impressed, that is! Enough to want to share the tip with you! Here’s the recipe…
Homemade Powdered Laundry Detergent
1 bar soap (REAL soap, that is…not a “beauty bar”) (Fels-Naptha [found in the laundry detergent isle], Ivory, and Kirk’s Castile soap are possible [but not all] options)
1 cup borax
1 cup washing soda (NOT baking soda…washing soda is found in the laundry isle)
To make your detergent is really simple. Grate the bar of soap as finely as you can. It could be grated with a hand grater, or chopped finely with a knife. After the initial grating, put it in a food processor to get it as finely grated as possible. Then add the borax and washing soda. Process until mixture is a fine powder.
That’s it! Store it in a tightly sealed container.
Use 1 to 2 tablespoons in a regular washing machine. Use 1 tablespoon in a high-efficiency washer. For an extremely dirty or heavy load, up to 1-1/2 tablespoons in a HE washer, but no more.
This powder will go a LONG way and costs far less than commercial detergents.
Tips for use
* Grate your soap as finely as possible. Many people use a hand grater to do the job then finish the work in a food processor. However you do it, the finer the soap is grated, the faster it will dissolve in the washer.
* Note that this detergent does not produce a lot of bubbles, so it is excellent for HE washers. Despite that, it cleans exceptionally well, so don’t fret over bubble-less water.
* My recipe above is unscented. Your clothes will have no smell when finished. If you prefer to have your laundry smelling like rain, the tropics, oranges, or whatever, add 3 to 5 drops of essential oil of your choice to the food processor when combining the grated soap, borax and washing soda. Be sure to store the finished detergent in a container with a tight fitting lid.
* The detergent may be added dry to your washing machine. However, if you prefer using a liquid and feel more comfortable having the soap granules dissolved beforehand, place about 1/2 cup of very hot to boiling water in a small bowl. Add 1 tablespoon detergent. Stir and allow it to sit about 5 minutes for the soap to dissolve. Stir the mixture and place it in the washer according to the manufacturer’s directions. When doing more than one load, start the next load’s detergent dissolving while the current load is being washed. That will avoid any delay in getting your laundry washed.
* Use 1/2 cup of white vinegar in your fabric softener dispenser of your washing machine. This will help keep any residue of soap from accumulating on your laundry and the machine.
Check out the video below to see the process. Judi
Lots of people are harvesting from their backyard gardens right now. Even if you don’t have one, you may have been given some beautiful produce from a friend. If you’re like me, I REALLY appreciate such gifts. However, I’m just feeding two right now, so we can’t eat a bushel of whatever before it goes bad. Hence, the need to preserve those goodies so they can be enjoyed whenever we’re ready for them.
Such is the case with my green beans. My neighbor has a large garden and has graciously shared their abundance with us. So I froze the extra and made a video of the process. Perhaps there are some folks out there who just don’t know how to properly freeze their fresh veggies. So, I’m offering that tip to help. The link to the video is at the end of this post.
Here are the simple steps it takes to freeze those extra green beans…
* Wash them extremely well and allow them to drain. Cut or snap off the ends and any bad parts, then break or cut them into whatever size pieces you want.
* Bring a large pot of water to a rolling boil. Place the prepared beans into the boiling water. Immediately set your timer for 2 minutes. (Do NOT wait for the water to come back to a boil before setting the timer.) As soon as the timer goes off, drain them.
* As soon as they’re drained, place the beans into a large bowl or pot of ice water. Allow them to cool in the cold water until they are no longer warm. Drain them well.
* Place the beans in freezer bags (one large bag or smaller meal-size bags…it’s your choice). Label bags with contents and date they were frozen. Lay them flat in the freezer, spreading the beans outward within the bag as much as possible (so you don’t have one large clump of frozen beans!). Once the beans are frozen, the bags may be repositioned in the freezer if needed.
* Enjoy them whenever you’re ready!!
Hope this helps in your quest to preserve that bounty. Judi
Recently when I was grocery shopping, I felt like trying something new. I grabbed a couple Larabars. They looked interesting and I had never tasted one before. I opened one for dessert after supper that evening. Ohhhhhhhhhhhhhhhhhhhh!! One bite and I was hooked! It was awesome–delicious but not overly sweet, and the ingredients weren’t all chemicals or adulterated foods! They even passed the husband test!
With that, I looked on the Internet for recipes for such bars. They were everywhere. BUT, what I noticed was that the recipes were basically the same. All mimicked the original Larabar. Because of my nutrition background, I decided to work with it a little to boost the nutrient value even more. For starters, I came up with the recipe below. Chocolate Brownie Bars are no bake, grain free, no soy, etc. I added flax meal and chia seeds to boost the nutritional value, while cutting down a bit on the added chocolate chips. You can add more if you want, but I felt less was best here (from a health standpoint).
So…try them for yourself. They’re really easy and quick to make, and oh-so-yummy to enjoy. The recipe can easily be increased to make more at one time. I recorded a YouTube video and placed the link below, so you can see how they’re made. Enjoy! Judi
Chocolate Brownie Bars (No bake, grain free)
1/2 cup chopped dates
2 Tablespoons water
1/4 cup walnut pieces*
1/4 cup cashew pieces*
2 tsp flax meal
1 Tbsp semi-sweet chocolate chips
2 tsp unsweetened cocoa powder
1 tsp ground chia seeds
Pinch of salt**
Place chopped dates in a small bowl. Pour 2 tablespoons of boiling water over dates and allow them to soften for 5 to 10 minutes. Alternatively place chopped dates in a small microwave safe bowl. Add 2 tablespoons tap water. Microwave about 30 seconds, until water has boiled. Remove and allow dates to soften for 5 to 10 minutes. Drain any remaining water from the dates, but no need to pat them dry on a towel.
Place all ingredients in a food processor or high-power blender. Process until ingredients are well chopped up and stick together.
With a spatula, remove mixture to a large piece of waxed paper or plastic wrap. With spatula, form into a bar shape. Wrap tightly and place in refrigerator overnight to firm up and for flavors to blend.
Slice into small pieces and enjoy!
Note: This recipe can easily be increased so it can be formed in a loaf pan for larger size serving pieces. Line the loaf pan with plastic wrap before placing mixture into the pan. Wrap the formed bar with the excess of the same piece of plastic wrap before placing bar in the refrigerator to firm up.
* Walnut and cashew pieces may be natural or roasted and salted
** Omit added salt if walnut or cashew pieces are already salted
We all do it at one time or another–get something on our clothes that might leave a stain. There are lots of assorted stain removers on the market. Some work, some don’t. It seems there’s a chemical of some sort available for just about every job around the house. Is it truly necessary to buy a different chemical for literally everything? I think not. I’ve been using this trick for stain removal for YEARS. It works, plain and simple, and no special chemical is needed.
As soon as possible (and we know that right away is not always possible, hence…as “soon” as possible), take the item and run cold (yes COLD) water over the stain. Then use whatever soap is handy, preferably a BAR of soap (but liquid soap will also work–it’s just not quite as concentrated as a solid bar of soap) and rub the soap into the stain, working up a lather. Gently rub the soap in with your fingers. You could also take the fabric and rub it on itself to scrub the stain. As you work in the soap, you should see the stain diminish. Feel free to rinse with more cold water and repeat the process.
Leave some soap on the fabric, then put the item in the washing machine with your usual laundry detergent and cold or cool water. Do NOT use hot water, because heat will set stains. If there is any stain residue left on the fabric, any heat will set the stain and you won’t be able to get it out after that.
When the item comes out of the washing machine, inspect it to see if all the stain was removed. If you’re certain it came out, the item may be placed in the dryer. If you’re not certain–some stains can’t be seen easily on wet fabrics–allow the item to air dry. If the stain is still there, repeat the process. Do not subject the item to heat until you’re sure all the stain is out. Once it’s out, it can be dried in the dryer and will be good as new!
To see a demonstration of this where I took white cotton cloth and smeared blackberry jam on it and used this method to remove the stain, watch the video below.
People are actively trying to work more vegetables into their meals these days…at least that’s what we’re told to do. AND that’s what we SHOULD be doing. Here’s a delicious way to add green beans and tomatoes to a meal. It’s extremely fast and easy to prepare, has great eye-appeal AND flavor. Try it sometime! The recipe is below, following by a link to my video on preparing this dish. Enjoy! Judi
FAST, EASY, Delicious Green Beans with Tomatoes
1 Tbsp extra virgin olive oil
1 clove garlic, finely chopped
2 to 2-1/4 cups frozen, thawed green beans
1 to 2 Tbsp water
1/4 to 1/2 tsp dry basil leaves
1/8 to 1/4 tsp salt
1 small fresh tomato, cut into bite size pieces
Warm a skillet over medium heat. Add 1 tablespoon extra virgin olive oil. Allow oil to warm very briefly, then add the chopped garlic to the pan. Allow garlic to cook briefly, then add the thawed green beans to the skillet. Stir to combine and allow beans to heat briefly.
Add 1 or 2 tablespoons of water, depending upon how soft you like your green beans. Sprinkle with basil leaves and salt; stir to combine. Add the chopped tomato. Cover skillet with lid and allow to cook for 2 minutes (YEP–that’s it!), or until vegetables are to your desired tenderness. Serve.